Chevrolet Cruze Repair Manual: Forward Lamp Wiring Harness Replacement
Preliminary Procedures
- Remove the front bumper. Refer to Front Bumper Fascia Replacement.
- Remove the headlamp. Refer to Headlamp Replacement.
- Using a scan tool, check for DTCs.
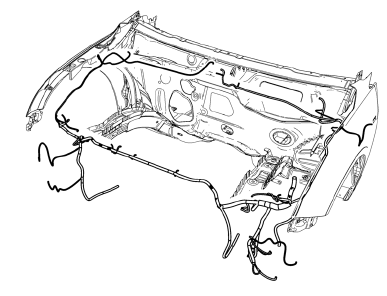
Forward Lamp Wiring Harness
Tip
- Create a work area large enough to lay out the new and old wiring harnesses.
- Use care when removing inaccessible harness retainers. Replacement retainers may not be available.
- Compare the new and old wiring harnesses for the same part number, the same number of wiring harness connectors, the same pin settings, and the same harness retainers.
- Follow a logical order of steps during the replacement to ensure proper installation of the harness.
Rear License Plate Lamp Replacement
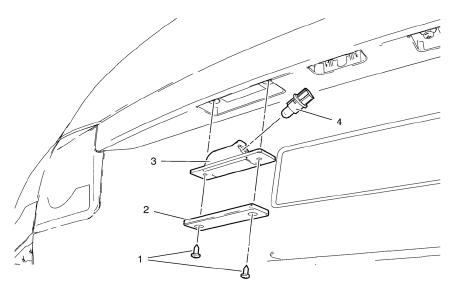
- Rear License Plate Lamp Screw (Qty: 2)
Caution: Refer to Fastener Caution in the Preface section.
Tighten 3 N·m (27 lb in)
- Rear License Plate Lamp
Tip
Rotate the left corner of the lamp assembly upward and pull the right side down out from the rear bumper fascia opening.
- Rear License Plate Lamp Socket
Tip
Rotate the lamp socket counterclockwise and remove.
- Rear License Plate Lamp Bulb
Tip
Service the bulb, as needed.
 Backup Lamp Replacement
Preliminary Procedures
Remove the rear compartment sill trim plate. Refer to Rear Compartment
Sill Trim Plate Replacement.
Disconnect the electrical harness connector from the backu ...
 Tail Lamp Replacement
Preliminary Procedures
Open and support the rear compartment
lid.
Remove the body side trim panel replacement in order to expose the tail
lamp pocket nuts. Refer to Body Side Tr ...
Other materials:
Rear Side Door Window Adjustment
Warning: Refer to Glass and Sheet Metal Handling Warning in the Preface
section.
Warning: Refer to Express Window Down Warning in the Preface section.
Preliminary Procedures
Remove the rear side door trim. Refer to Rear Side Door Trim
Replacement.
Remove the water deflector. ...
Service
This vehicle may have the new environmentally friendly refrigerant, R1234yf.
This refrigerant has a significantly reduced global warming impact on the environment,
compared to the traditional automotive refrigerant, R-134a. All vehicles have a
label underhood that identifies the refrigerant us ...
Pandora Internet Radio
Pandora® (if equipped) is a free Internet radio service that streams personalized
radio stations based on artists, songs, genres, and comedians. Create stations using
the Pandora website or smartphone application, then use
(thumbs up) or
(thumbs down) to personalize stations.
To set up an ...
