Chevrolet Cruze Repair Manual: Tail Lamp Replacement
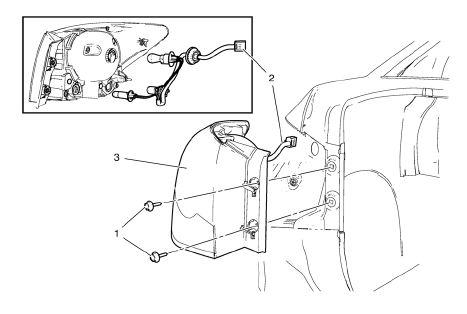
Preliminary Procedures
- Open and support the rear compartment lid.
- Remove the body side trim panel replacement in order to expose the tail lamp pocket nuts. Refer to Body Side Trim Panel Replacement - Left Side.
- Tail Lamp Bolt (Qty: 2)
Caution: Refer to Fastener Caution in the Preface section.
Tighten 2.5 N·m (22 lb ft)
- Tail Lamp Control Module with Bulb Assembly
Tip
Rotate the control module with bulbs counterclockwise and remove from the tail lamp housing.
- Tail Lamp Assembly
Warning: Refer to Halogen Bulb Warning in the Preface section.
Procedure
- Using a blunt tool, tap gently on the tail lamp studs before attempting to remove the tail lamp assembly from the lamp pocket.
- Pull the tail lamp assembly rearward.
- Disconnect the tail lamp control module with bulbs assembly electrical connector.
Tail Lamp Bulb Replacement
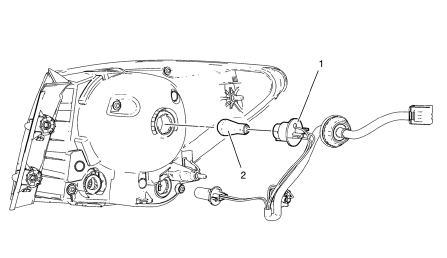
Preliminary Procedure
Remove the rear tail lamp assembly. Refer to Tail Lamp Replacement.
- Tail Lamp Bulb Harness Socket
Procedure
Rotate the bulb socket from the tail lamp housing.
- Tail Lamp Bulb
Procedure
Pull the bulb straight from the lamp harness socket
 Forward Lamp Wiring Harness Replacement
Preliminary Procedures
Remove the front bumper. Refer to Front Bumper Fascia Replacement.
Remove the headlamp. Refer to Headlamp Replacement.
Using a scan tool, check for DTCs.
Forward ...
 Exterior Lighting Systems Description and Operation
Exterior Lamps
The exterior lighting system consists of the following lamps if equipped:
Headlamps
Daytime Running Lamps (DRL)
Front fog lamps
Rear fog lamps
Park, tail and license lamps
...
Other materials:
Passenger Seat Frame Replacement
Removal Procedure
Remove front seat cushion cover (1) and pad (2) from frame (3). Refer to
Front Seat Cushion Cover and Pad Replacement
Remove the wire harness (1), if equipped.
Remove front seat back cushion cover (1) and pad (2) from frame (3).
Refer to Driv ...
Removal Procedure
Warning: Refer to Approved Equipment for Collision Repair Warning in the
Preface section.
Warning: Refer to Glass and Sheet Metal Handling Warning in the Preface section.
Disable the SIR System. Refer to SIR Disabling
and Enabling.
Disconnect the negative battery cable. Refer to ...
Rear Side Door Replacement
Preliminary Procedure
Remove the rear side door trim panel. Refer to Rear Side Door Trim
Replacement.
Rear Side Door Check Link Bolt
Caution: Refer to Fastener Caution in the Preface section.
Procedure
Remove the water deflector
Disconnect the door electrical connector.
Suppo ...
