Chevrolet Cruze Owners Manual: Overview
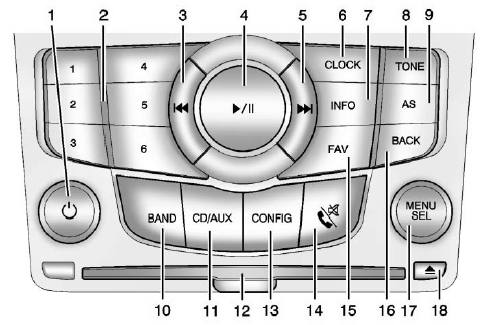
1.  • Turns the system on or off and adjusts the volume.
2. Buttons 1 to 6
• Radio: Saves and selects favorite stations.
3.  • Radio: Seeks the previous station.
• CD: Selects the previous track or rewinds within a track.
4.  • CD: Pauses playback, and stops playback.
5.  • Radio: Seeks the next station.
• CD: Selects the next track or fast forwards within a track.
6. CLOCK
• Opens the clock menu.
7. INFO
• Radio: Shows available information about the current station.
• CD: Shows available information about the current track.
8. TONE
• Opens the tone menu.
9. AS
• Radio: Opens the autostore stations list.
10. BAND
• Changes the band while listening to the radio.
• Selects the radio when listening to a different audio source.
11. CD/AUX
• Selects the CD player or an external audio source.
12. CD Slot
• Insert a CD.
13. CONFIG
• Opens the settings menu.
14.  • Opens the phone main menu.
• Mutes the audio system.
15. FAV
• Radio: Opens the favorites list.
16. BACK
• Menu: Moves one level back.
• Character Input: Deletes the last character.
17. MENU/SEL
• Turn to open menus, highlight menu items, or set numeric values while in a menu.
• Press to select menu items.
• Radio: Manually selects radio stations.
• CD: Selects tracks.
18.  • Removes a disc from the CD slot.
 Theft-Deterrent Feature
The theft-deterrent feature works by learning a portion of the Vehicle Identification
Number (VIN) to the infotainment system. The infotainment system does not operate
if it is stolen or moved to ...
 Operation
Controls
The infotainment system is operated by using the pushbuttons, multifunction knobs,
menus shown on the display, and steering wheel controls, if equipped.
Turning the System On or Off
(Vo ...
Other materials:
Installation Procedure
Create 5 x 18 mm (4/16 x 11/16 in) slots for MIG-Brazing along the edges
of the front wheelhouse panel rear reinforcement as
noted from the original panel.
Create a 5 x 18 mm (4/16 x 11/16 in) slot for MIG-Brazing where front
wheelhouse front panel and front wheelhouse panel ...
Removal Procedure
Warning: Refer to Approved Equipment for Collision Repair Warning in the
Preface section.
Warning: Refer to Collision Sectioning Warning in the Preface section.
Warning: Refer to Glass and Sheet Metal Handling Warning in the Preface section.
Disable the SIR System. Refer to SIR Dis ...
Navigation
OnStar navigation requires the Directions and Connections service plan.
Press to receive directions or have
them sent to the vehicle navigation screen, if equipped.
Destinations can also be forwarded to the vehicle from MapQuest.com.
The OnStar mapping database is continuously updated. For cov ...
