Chevrolet Cruze Owners Manual: Lower Anchors and Tethers for Children (LATCH System)
The LATCH system secures a child restraint during driving or in a crash.
LATCH attachments on the child restraint are used to attach the child restraint to the anchors in the vehicle. This system is designed to make installation of a child restraint easier.
Make sure that a LATCH-compatible child restraint is properly installed using the anchors, or use the vehicle's safety belts to secure the restraint, following the instructions that came with that restraint, and also the instructions in this manual.
When installing a child restraint with a top tether, you must also use either the lower anchors or the safety belts to properly secure the child restraint. A child restraint must never be installed using only the top tether anchor.
In order to use the LATCH system in the vehicle, you need a child restraint that has LATCH attachments. The child restraint manufacturer will provide you with instructions on how to use the child restraint and its attachments. The following explains how to attach a child restraint with these attachments in the vehicle.
Not all vehicle seating positions or child restraints have lower anchors and attachments or top tether anchors and attachments.
Lower Anchors
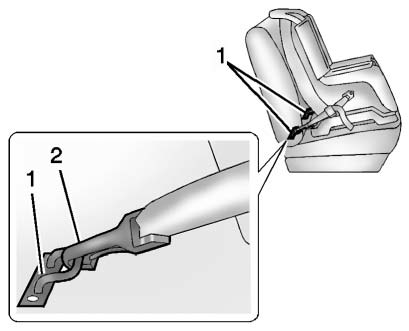
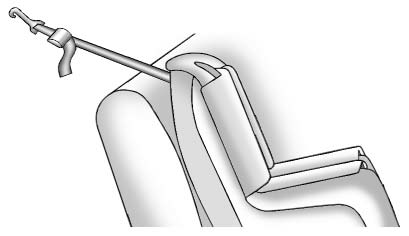
Lower anchors (1) are metal bars built into the vehicle. There are two lower anchors for each LATCH seating position that will accommodate a child restraint with lower attachments (2).
Top Tether Anchor
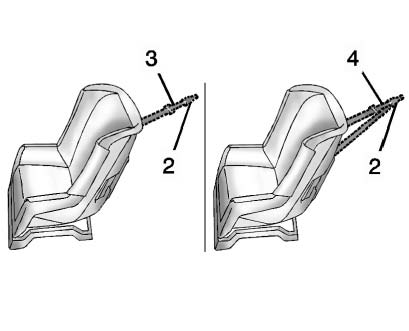
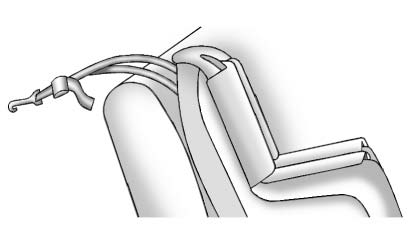
A top tether (3, 4) anchors the top of the child restraint to the vehicle.
A top tether anchor is built into the vehicle. The top tether attachment (2) on the child restraint connects to the top tether anchor in the vehicle in order to reduce the forward movement and rotation of the child restraint during driving or in a crash.
The child restraint may have a single tether (3) or a dual tether (4).
Either will have a single attachment (2) to secure the top tether to the anchor.
Some child restraints that have a top tether are designed for use with or without the top tether being attached. Others require the top tether always to be attached. In Canada, the law requires that forward-facing child restraints have a top tether, and that the tether be attached. Be sure to read and follow the instructions for the child restraint.
Lower Anchor and Top Tether Anchor Locations
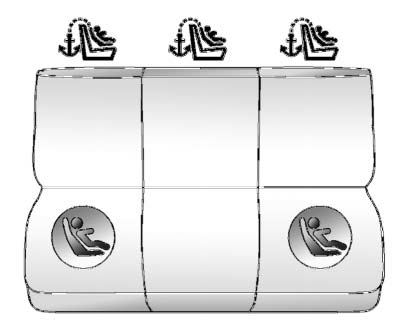
Rear Seat
 (Top Tether Anchor):
Seating positions with top tether anchors.
 (Lower Anchor):
Seating positions with two lower anchors.
To assist in locating the lower anchors, each rear anchor position has a label, near the crease between the seatback and the seat cushion.
To assist in locating the top tether anchors, the top tether anchor symbol is on the cover.
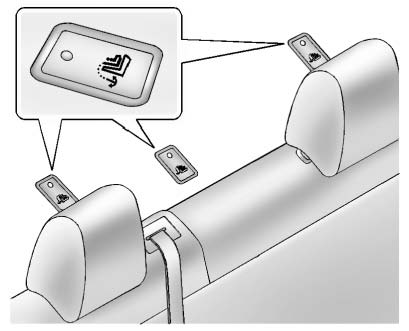
The top tether anchors are under the covers, behind the rear seat, on the filler panel. Be sure to use an anchor on the same side of the vehicle as the seating position where the child restraint will be placed.
Do not secure a child restraint in a position without a top tether anchor if a national or local law requires that the top tether be attached, or if the instructions that come with the child restraint say that the top tether must be attached
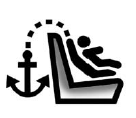
According to accident statistics, children and infants are safer when properly restrained in a child restraint system or infant restraint system secured in a rear seating position.
Securing a Child Restraint Designed for the LATCH System
WARNING
If a LATCH-type child restraint is not attached to anchors, the child restraint will not be able to protect the child correctly. In a crash, the child could be seriously injured or killed. Install a LATCH-type child restraint properly using the anchors, or use the vehicle safety belts to secure the restraint, following the instructions that came with the child restraint and the instructions in this manual.
WARNING
Do not attach more than one child restraint to a single anchor.
Attaching more than one child restraint to a single anchor could cause the anchor or attachment to come loose or even break during a crash. A child or others could be injured. To reduce the risk of serious or fatal injuries during a crash, attach only one child restraint per anchor.
WARNING
Children can be seriously injured or strangled if a shoulder belt is wrapped around their neck and the safety belt continues to tighten. Buckle any unused safety belts behind the child restraint so children cannot reach them. Pull the shoulder belt all the way out of the retractor to set the lock, if the vehicle has one, after the child restraint has been installed.
Notice: Do not let the LATCH attachments rub against the vehicle’s safety belts. This may damage these parts. If necessary, move buckled safety belts to avoid rubbing the LATCH attachments.
Do not fold the empty rear seat with a safety belt buckled. This could damage the safety belt or the seat. Unbuckle and return the safety belt to its stowed position, before folding the seat.
This system is designed to make installation of child restraints easier.
When using lower anchors, do not use the vehicle's safety belts.
Instead use the vehicle's anchors and child restraint attachments to secure the restraints. Some restraints also use another vehicle anchor to secure a top tether.
1. Attach and tighten the lower attachments to the lower anchors. If the child restraint does not have lower attachments or the desired seating position does not have lower anchors, secure the child restraint with the top tether and the safety belts. Refer to the child restraint manufacturer instructions and the instructions in this manual.
1.1. Find the lower anchors for the desired rear outboard seating position.
1.2. Put the child restraint on the seat.
For outboard rear seating positions, if the head restraint interferes with the proper installation of the child restraint, the head restraint may be removed.
See “Head Restraint Removal and Reinstallation” at the end of this section.
1.3. Attach and tighten the lower attachments on the child restraint to the lower anchors.
2. If the child restraint manufacturer recommends that the top tether be attached, attach and tighten the top tether to the top tether anchor. Refer to the child restraint instructions and the following steps: 2.1. Find the top tether anchor.
Open the cover to expose the anchor.
2.2. Route, attach, and tighten the top tether according to the child restraint instructions and the following instructions:
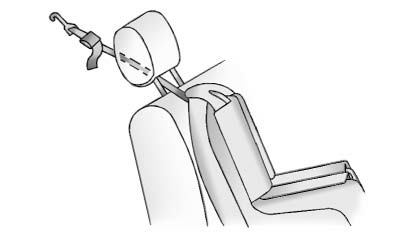
If you are using a single tether in a rear outboard seating position with an adjustable head restraint, raise the head restraint and route the tether under the head restraint and in between the head restraint posts.
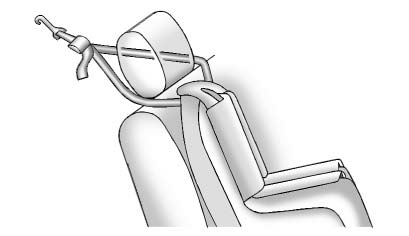
If you are using a dual tether in a rear outboard seating position with an adjustable head restraint, raise the head restraint and route the tether under the head restraint and around the head restraint posts.
If you are using a single tether in the center seating position, or the rear outboard head restraint has been removed, route the single tether over the seatback.
If you are using a dual tether in the center seating position, or the rear outboard head restraint has been removed, route the dual tether over the seatback.
3. Before placing a child in the child restraint, make sure it is securely held in place. To check, grasp the child restraint at the LATCH path and attempt to move it side to side and back and forth. There should be no more than 2.5 cm (1 in) of movement, for proper installation.
Head Restraint Removal and Reinstallation
The rear outboard head restraints can be removed if they interfere with the proper installation of the child restraint.
To remove the head restraint: 1. Partially fold the seatback forward.
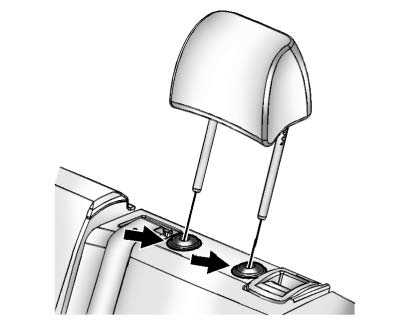
2. Press both buttons on the head restraint posts at the same time, and pull up on the head restraint.
3. Store the head restraint in the trunk of the vehicle.
4. When the child restraint is removed, reinstall the head restraint before the seating position is used.
WARNING
With head restraints that are not installed and adjusted properly, there is a greater chance that occupants will suffer a neck/ spinal injury in a crash. Do not drive until the head restraints for all occupants are installed and adjusted properly.
To reinstall the head restraint:

1. Insert the head restraint posts into the holes in the top of the seatback. The notches on the posts must face the driver side of the vehicle.
2. Push the head restraint down.
If necessary, press the height adjustment release button to further lower the head restraint.
3. Try to move the head restraint to make sure that it is locked in place.
 Where to Put the Restraint
According to accident statistics, children and infants are safer when properly
restrained in a child restraint system or infant restraint system secured in a rear
seating position.
We recommend t ...
 Replacing LATCH System Parts After a Crash
WARNING
A crash can damage the LATCH system in the vehicle. A damaged LATCH system
may not properly secure the child restraint, resulting in serious injury or even
death in a crash. To help make ...
Other materials:
Installation Procedure
Clean and prepare the attaching surfaces for welding.
Position the roof rear header panel (1) on the vehicle.
Verify the fit of the panel.
Clamp the roof rear header panel into position.
Spot weld accordingly as noted from the original panel.
Apply the sealer ...
Rear Compartment Lid Emblem/Nameplate Replacement (Cruze - Right Side)
Rear Compartment Lid Emblem Assembly
Caution: Refer to Exterior Trim Emblem Removal Caution in the Preface
section.
Procedure
The part and surface should be 21°C (70°F) prior to installation. The
vehicle should remain 21°C (70°F) for
one hour after assembly to allow adhesive to deve ...
Removal Procedure
Remove the drivetrain and front suspension frame. Refer to Drivetrain
and Front Suspension Frame Replacement.
Mark Installation position of insulator (2) at frame (1).
Cut out frame insulator core (1) from frame insulator (2).
Note: On the rear insulator dril ...
