Chevrolet Cruze Owners Manual: Rear Seats
Either side of the rear seatback can be folded.
To fold the rear seatbacks: 1. Place the front seatbacks in the upright position.
Notice: Folding a rear seat with the safety belts still fastened may cause damage to the seat or the safety belts. Always unbuckle the safety belts and return them to their normal stowed position before folding a rear seat.
2. Unbuckle the rear safety belts and make sure the safety belt buckles are stowed in the pockets in the seat cushion.
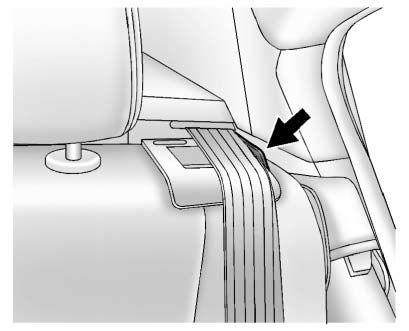
3. Make sure the safety belt is in the guide on top of the seatback.
4. Reach under the safety belt and pull the lever to unlock the seatback.
A tab near the seatback lever raises when the seatback is unlocked.
5. Fold the seatback forward.
Repeat Steps 1–4 for the other seatback, if desired.
To raise the seatback:
WARNING
A safety belt that is improperly routed, not properly attached, or twisted will not provide the protection needed in a crash. The person wearing the belt could be seriously injured. After raising the rear seatback, always check to be sure that the safety belts are properly routed and attached, and are not twisted.
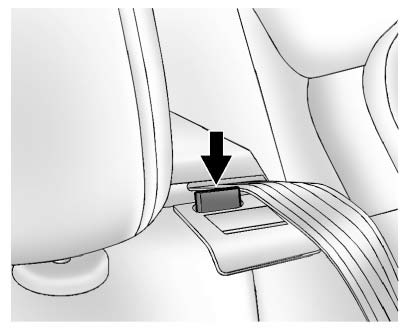
1. Make sure the safety belt is in the guide on the top of the seatback.
2. Lift the seatback up and push it rearward until it clicks into place.
Keep the safety belts clear of the seatback and untwisted.
A tab near the seatback lever retracts when the seatback is locked in place.
The center rear safety belt may lock when you raise the seatback. If this happens, let the belt go back all the way and start again.
WARNING
If the seatback is not locked, it could move forward in a sudden stop or crash. That could cause injury to the person sitting there.
Always pull forward on the top of the seatback at the area of the latch to be sure it is locked.
3. Push and pull on the seatback to make sure it is locked into position.
4. Repeat Steps 1–3 for the other seatback, if necessary.
Keep the seat in the upright locked position when not in use.
 Heated Front Seats
WARNING
If you cannot feel temperature change or pain to the skin, the seat heater
may cause burns. To reduce the risk of burns, people with such a condition should
use care when using the seat h ...
 Safety Belts
This section of the manual describes how to use safety belts properly. It also
describes some things not to do with safety belts.
WARNING
Do not let anyone ride where a safety belt cannot be worn ...
Other materials:
Rear Side Door Trim Replacement
Rear Side Door Inside Handle Bolt Finish Cap
Procedure
Pull handle back to remove cap. Use suitable tool to unsnap.
Rear Side Door Inside Handle Screw
Caution: Refer to Fastener Caution in the Preface section.
Tighten
2.5 N·m (23 lb in)
Rear Side Door Pull Handle Screw
T ...
Headlamp Mount Panel Replacement (MIG-Brazing)
Note: According to different corrosion warranties, only the
regional mandatory joining methods are allowed.
Removal Procedure
Warning: Refer to Approved Equipment for Collision Repair Warning in the
Preface section.
Warning: Refer to Glass and Sheet Metal Handling Warning in the Preface sec ...
Steering Wheel Controls
Depending on the vehicle options, some audio functions can be controlled through
the steering wheel controls.
(Push to Talk): Press to interact
with Bluetooth or voice recognition.
(Mute/End Call): Press to decline
an incoming call, or to end a current call. Press to silence the vehicle ...
