Chevrolet Cruze Repair Manual: Power Steering
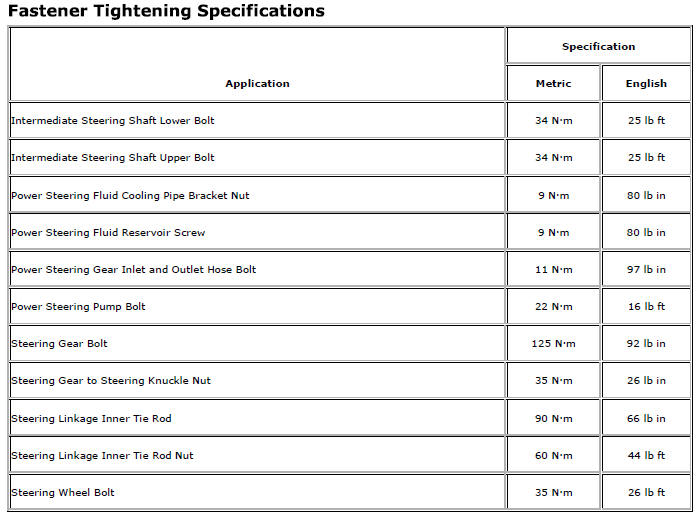
Specifications
Power Steering System Bleeding

Note:
- Use clean, new power steering fluid type only. See the Maintenance and Lubrication subsection for fluid specifications.
- Hoses touching the frame, body or engine may cause system noise. Verify that the hoses do not touch any other part of the vehicle.
- Loose connections may not leak, but could allow air into the steering system. Verify that all hose connections are tight.
Note: Power steering fluid level must be maintained throughout bleed procedure.
- Fill pump reservoir with fluid to minimum system level, FULL COLD level, or middle of hash mark on cap stick fluid level indicator.
Note: With hydro-boost only, the oil level will appear falsely high if the hydro-boost accumulator is not fully charged. Do not apply the brake pedal with the engine OFF. This will discharge the hydro-boost accumulator.
- If equipped with hydro-boost, fully charge the hydro-boost accumulator using the following procedure:
2.1. Start the engine.
2.2. Firmly apply the brake pedal 10-15 times.
2.3. Turn the engine OFF.
- Raise the vehicle until the front wheels are off the ground. Refer to Lifting and Jacking the Vehicle.
- Key on engine OFF, turn the steering wheel from stop to stop 12 times.
Note: Vehicles equipped with hydro-boost systems or longer length power steering hoses may require turns up to 15 to 20 stop to stops.
- Verify power steering fluid level per operating specification. Refer to Checking and Adding Power Steering Fluid.
- Start the engine. Rotate steering wheel from left to right. Check for sign of cavitation or fluid aeration (pump noise/whining).
- Verify the fluid level. Repeat the bleed procedure, if necessary.
- Checking and Adding Power Steering Fluid
- Power Steering Fluid Reservoir Replacement
- Steering Linkage Outer Tie Rod Replacement
- Steering Gear Boot Replacement
- Power Steering Gear Inlet Pipe/Hose Replacement
- Steering Gear Replacement (Hydraulic Power Steering)
- Steering Linkage Inner Tie Rod Replacement (Hydraulic Power Steering)
- Steering Linkage Inner Tie Rod Replacement (Electronic Power Steering)
- Power Steering System Description and Operation
- Variable Effort Steering System Description and Operation
 Steering
...
 Checking and Adding Power Steering Fluid
Caution: When adding fluid or making a complete fluid change, always
use the proper power steering fluid. Failure to use the proper fluid
will cause hose and seal damage and fluid leaks.
Clean ...
Other materials:
Reclining Seatbacks
WARNING
If either seatback is not locked, it could move forward in a sudden stop or
crash. That could cause injury to the person sitting there.
Always push and pull on the seatbacks to be sure they are locked.
To recline the seatback:
1. Lift the lever.
If necessary, move the safety belt ou ...
OnStar Additional Information
Transferring Service
Press to request account transfer
eligibility information. The Advisor can assist in canceling or removing account
information. If OnStar receives information that vehicle ownership has changed,
OnStar may send a voice message to the vehicle, requesting updated account i ...
Manual Transmission
Shift Pattern
All Models Except Fuel Economy Model
Fuel Economy Model
These are the shift patterns for the six-speed manual transmissions.
To operate the transmissions:
Notice: Do not rest your hand on the shift lever while driving. The
pressure could cause premature wear in the transmiss ...
