Chevrolet Cruze Repair Manual: Steering Linkage Outer Tie Rod Replacement
Preliminary Procedure
Remove the tire and wheel assembly. Refer to Tire and Wheel Removal and Installation.
- Steering Linkage Tie Rod Nut
Caution: Refer to Fastener Caution in the Preface section.
Tighten 35 N·m (26 lb ft)
- Steering Linkage Inner Tie Rod Nut
Tighten 60 N·m (44 lb ft)
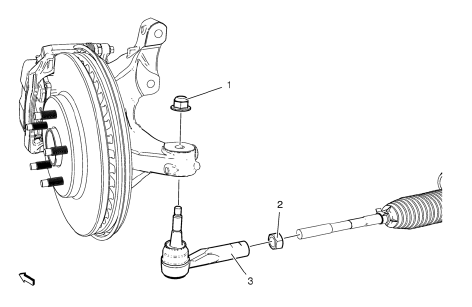
- Steering Linkage Outer Tie Rod
Procedure
- Use CH-161-B puller to separate the steering linkage outer tie rod from the steering knuckle.
- Inspect the steering linkage inner tie rod for bent or damaged threads.
- Clean the tapered surface of the steering knuckle.
- Center the steering angle sensor. Refer to Steering Angle Sensor Centering
- Check and adjust wheel alignment. Refer to Wheel Alignment Measurement.
Special Tools
CH-161-B Puller
For equivalent regional tools, refer to Special Tools.
 Power Steering Fluid Reservoir Replacement
Preliminary Procedure
Remove as much power steering fluid from the remote power steering fluid
reservoir as possible.
Place drain pans under the vehicle as needed.
Hose Clamp
Pro ...
 Steering Gear Boot Replacement
Special Tools
CH-804 Drive Axle Seal Clamp Pliers
Removal Procedure
Remove the steering linkage outer tie rod. Refer to Steering Linkage Outer
Tie Rod Replacement.
Remove the steering lin ...
Other materials:
Removal Procedure
Warning: Refer to Approved Equipment for Collision Repair Warning in the
Preface section.
Warning: Refer to Collision Sectioning Warning in the Preface section.
Warning: Refer to Glass and Sheet Metal Handling Warning in the Preface section.
Disable the SIR System. Refer to SIR Dis ...
Installation Procedure
Cut the rear side rail in corresponding locations to fit the remaining
original panel. The sectioning joint should be trimmed to allow a
gap of one-and-one-half-times the metal thickness at the sectioning joint.
Create a 50 mm (2 in) backing plate from the unused portion of the
serv ...
Remote Keyless Entry (RKE) System Operation
The transmitter functions may work up to 60m(195 ft) away from the vehicle. On
vehicles with remote start the distance will be greater.
Keep in mind that other conditions, such as those previously stated, can impact
the performance of the transmitter.
(Lock): Press to lock all doors.
The t ...
