Chevrolet Cruze Repair Manual: Rear Compartment Lid Hinge Torque Rod Replacement
Preliminary Procedure
Remove rear compartment lid. Refer to Rear Compartment Lid Replacement.
Special Tools
BO-125 Torque Rod Lifter
For equivalent regional tools, refer to Special Tools.
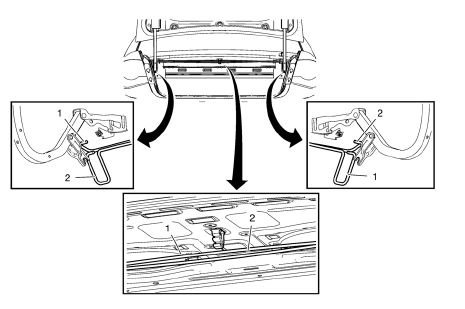
- Rear Compartment Lid Hinge Torque Rod - Right Side
Tip
Only use the special tool to remove and install the rear compartment lid hinge torque rod.
- Rear Compartment Lid Hinge Torque Rod - Left Side
Tip
Only use the special tool to remove and install the rear compartment lid hinge torque rod.
Hood Rear Weatherstrip Replacement
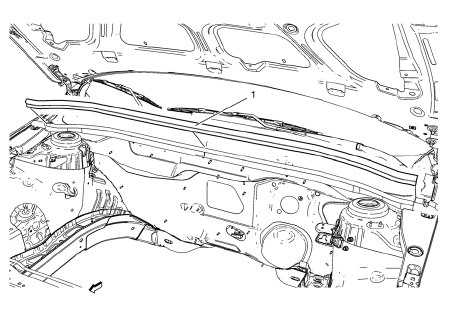
- Hood Rear Weatherstrip
 Hood Hold-Open Rod Replacement
Warning: Refer to Hood Hold-Open Device Warning in the Preface section.
Preliminary Procedure
Remove the radiator grille reinforcement support. Refer to Radiator Grille
Reinforcement Support R ...
 Radiator Grille Reinforcement Support Replacement
Preliminary Procedure
Remove the front bumper fascia. Refer to Front Bumper Fascia Replacement.
Radiator Grille Reinforcement Support Bolt (Qty: 4)
Caution: Refer to Fastener Caution in th ...
Other materials:
If the Vehicle Is Stuck
Slowly and cautiously spin the wheels to free the vehicle when stuck in sand,
mud, ice, or snow.
If stuck too severely for the traction system to free the vehicle, turn the traction
system off and use the rocking method.
WARNING
If the vehicle's tires spin at high speed, they can explode, ...
Removal Procedure
Warning: Refer to Approved Equipment for Collision Repair Warning in the
Preface section.
Disable the SIR System. Refer to SIR Disabling and Enabling.
Disconnect the negative battery cable. Refer to Battery Negative Cable
Disconnection and Connection.
Remove all related panels and ...
Engine Compartment Fuse Block
To remove the fuse block cover, squeeze the clips and swing it up.
Notice: Spilling liquid on any electrical component on the vehicle
may damage it. Always keep the covers on any electrical component.
Engine Compartment Fuse Block
The vehicle may not be equipped with all of the fuses, relay ...
