Chevrolet Cruze Repair Manual: Removal Procedure
Warning: Refer to Approved Equipment for Collision Repair Warning in the Preface section.
- Disable the SIR System. Refer to SIR Disabling and Enabling.
- Disconnect the negative battery cable. Refer to Battery Negative Cable Disconnection and Connection.
- Remove all related panels and components.
- Visually inspect the damage. Repair as much of the damage as possible.
- Remove the sealers and anti-corrosion materials from the repair area, as necessary. Refer to Anti-Corrosion Treatment and Repair.
- Locate and mark all factory welds.
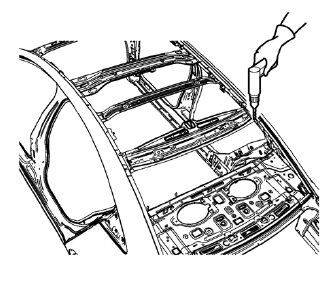
- Drill all factory welds. Note the number and location of welds for installation of the service assembly.
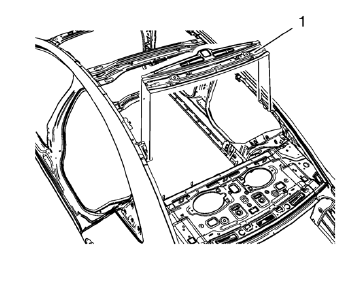
- Remove the damaged roof rear header panel (1).
 Roof Rear Header Panel Replacement (MIG-Brazing)
Note: According to different corrosion warranties, only the
regional mandatory joining methods are allowed. ...
 Installation Procedure
Clean and prepare the attaching surfaces for welding.
Position the roof rear header panel (1) on the vehicle.
Verify the fit of the panel.
Clamp the roof rear header panel into positi ...
Other materials:
General Plastic Repair
Warning: In order to reduce the risk of personal injury when exposed
to toxic fumes while grinding, cutting, or applying repair material on
any type of sheet molded compound or RIM rigid plastic, observe the following
guidelines:
Work in a properly ventilated area
Apply protective cream t ...
Overlap/Backing Plate Sectioning (Welding)
Warning: Refer to Approved Equipment for Collision Repair Warning in
the Preface section.
Fit the service panel to the vehicle to ensure a proper fit.
Measure and mark a line at the sail panel 120 mm (4 3/4 in) from the
back glass opening and 70 mm (2 3/4 in) rearward from the ...
Inflatable Restraint Module Handling and Scrapping
Special Tools
EL-38826 SIR Deployment Harness
EL-39401-B SIR Deployment Fixture
For equivalent regional tools, refer to Special Tools.
Live and Undeployed Inflator Module
Warning: Refer to SIR Inflator Module Handling and Storage Warning
in the Preface section.
Take special care when h ...
