Chevrolet Cruze Repair Manual: Steering Linkage Inner Tie Rod Replacement (Electronic Power Steering)
Special Tools
CH-6247 Removal and Installation Tool for the Steering Linkage Inner Tie Rod
For equivalent regional tools, refer to Special Tools.
Removal Procedure
- Raise and support the vehicle. Refer to Lifting and Jacking the Vehicle.
- Remove the tire and wheel assembly. Refer to Tire and Wheel Removal and Installation.
- Remove the steering linkage outer tie rod. Refer to Steering Linkage Outer Tie Rod Replacement.
- Remove the steering gear boot. Refer to Steering Gear Boot Replacement.
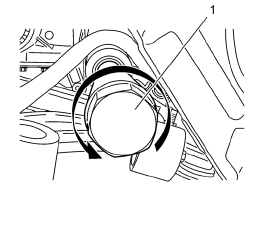
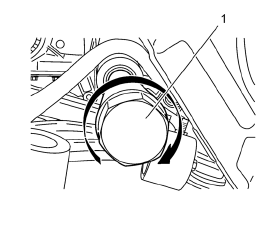
- Remove the steering linkage inner tie rod with CH-6247 remover/installer .
Installation Procedure
- Apply threadlock compound to the threads of the inner tie rod.
Caution: Refer to Fastener Caution in the Preface section.
- Install the steering linkage inner rod using the CH-6247 remover/installer and tighten to 105 N·m (77 lb ft).
- Install the steering gear boot. Refer to Steering Gear Boot Replacement.
- Install the steering linkage outer tie rod. Refer to Steering Linkage Outer Tie Rod Replacement.
- Install the tire and wheel assembly. Refer to Tire and Wheel Removal and Installation.
- Measure the wheel alignment. Refer to Wheel Alignment Measurement.
- Adjust front toe. Refer to Wheel Alignment - Steering Wheel Angle and/or Front Toe Adjustment.
- Center the steering angle sensor. Refer to Steering Angle Sensor Centering.
 Steering Linkage Inner Tie Rod Replacement (Hydraulic Power Steering)
Special Tools
CH-6247 Removal and Installation Tool for the Steering Linkage Inner Tie Rod
For equivalent regional tools, refer to Special Tools.
Removal Procedure
Raise and support the vehicle ...
 Power Steering System Description and Operation
The hydraulic power steering pump is a constant displacement vane-type pump
that provides hydraulic pressure and flow for the power
steering gear. The hydraulic power steering pumps are either belt ...
Other materials:
Installation Procedure
Cut the front compartment upper side rail in corresponding locations to
fit the remaining original panel. The sectioning joint should
be trimmed to allow a gap of one-and-one-half-times the metal thickness at
the sectioning joint.
Create a 50 mm (2 in) backing plate from the unused ...
Airbag System
The vehicle has the following airbags:
• A frontal airbag for the driver.
• A frontal airbag for the front outboard passenger.
• A knee airbag for the driver.
• A knee airbag for the front outboard passenger.
• A seat-mounted side impact airbag for the driver.
• A seat-mounted side impac ...
Engine Heater
The engine heater, if available, can help in cold weather conditions at or below
−18°C (0°F) for easier starting and better fuel economy during engine warm-up. Plug
in the heater at least four hours before starting the vehicle. An internal thermostat
in the plug end of the cord will prev ...
