Chevrolet Cruze Repair Manual: Tyre and Wheel Removal and Installation
Removal Procedure
- Raise and suitably support the vehicle. Refer to Lifting and Jacking the Vehicle.
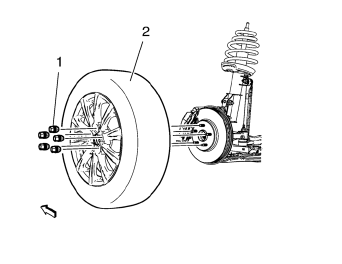
- Remove the wheel center cap.
- Mark the relationship of the wheel (2) to the hub.
- Remove the wheel nuts (1).
Warning: If penetrating oil gets on the vertical surfaces between the wheel and the rotor or drum it could cause the wheel to work loose as the vehicle is driven, resulting in loss of control and an injury accident.
Caution: Removing the wheel may be difficult because of foreign materials or a tight fit between the wheel and the hub/rotor.
Slightly tap the tire side wall with a rubber mallet in order to remove the wheel. Failure to follow these instructions may result in damage to the wheel.
- Remove the tire and wheel assembly from the vehicle. If the tire and wheel assembly is difficult to remove, perform the following steps:
5.1. Install and tighten all wheel nuts on the affected wheel.
5.2. Loosen each wheel nut two turns.
5.3. Lower the vehicle.
5.4. Rock the vehicle from side to side.
5.5. Repeat this procedure if necessary.
- If the tire and wheel assembly still does not loosen, perform the following steps:
6.1. Start the engine.
6.2. Drive the vehicle forward and rearward slightly while applying quick, hard jabs of the brakes prior to changing direction.
6.3. Repeat this procedure if necessary.
Installation Procedure
Warning: Before installing the wheels, remove any buildup of corrosion on the wheel mounting surface and brake drum or disc mounting surface by scraping and wire brushing. Installing wheels with poor metal-to-metal contact at the mounting surfaces can cause wheel nuts to loosen. This can cause a wheel to come off when the vehicle is moving, causing loss of control and possibly personal injury.
Note: Wheel nuts, studs, and mounting surfaces must be clean and dry.
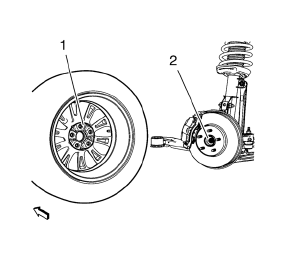
- Remove any corrosion or foreign material from the wheel (1) and the hub (2) mounting surfaces.
- Clean the threads on the wheel studs and wheel nuts.
- Install the tire and wheel assembly. Align the locating mark of the wheel to the hub.
- Install the wheel nuts.
Caution: Refer to Fastener Caution in the Preface section.
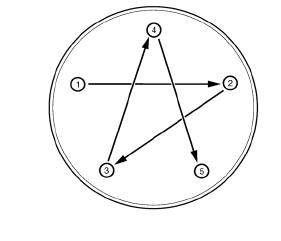
Note: Tighten the nuts evenly and alternately in the sequence shown, in order to avoid excessive runout.
- Tighten the wheel nuts in the sequence shown tighten the nuts in sequence to 140 N·m (100 lb ft).
- Install the wheel center cap.
- Lower the vehicle.
 Aluminum Wheel Refinishing
Finish Damage Evaluation Procedure
Note:
If the wheels are chrome-plated, do not re-plate or refinish the
wheels.
If the wheels are polished aluminum, do not refinish the wheels in
the de ...
 Tyre Repair
Warning:
Tire changing can be dangerous and should be done by trained professionals
using proper tools and procedures. Always read and
understand any manufacturer's warnings contained in their cus ...
Other materials:
Lamp Messages
AUTOMATIC LIGHT CONTROL ON
This message is displayed when the automatic light control has been turned on.
AUTOMATIC LIGHT CONTROL OFF
This message is displayed when the automatic light control has been turned off.
XXX TURN INDICATOR FAILURE
When one of the turn signals is out, this message disp ...
Configure Menu
The Configuration Menu is used to adjust features and preferences, such as Sound,
Radio, Nav (Navigation), Display, or Time Settings.
1. Press the Config screen button on the Home Page.
2. Touch-tap the scroll bar until the desired option displays. Select the desired
settings to change.
S ...
Front Seat Belt System
The front seat belt system includes a driver and passenger seat belt
pretensioner retractor. Both front seat belt pretensioners includes a
seat belt switch in the seat buckle which controls a reminder lamp and a tone
alarm.
Note: The front passenger seat is equipped with a passenger
presence ...
