Chevrolet Cruze Repair Manual: Front Side Door Upper Hinge and Lower Hinge Replacement

Preliminary Procedure
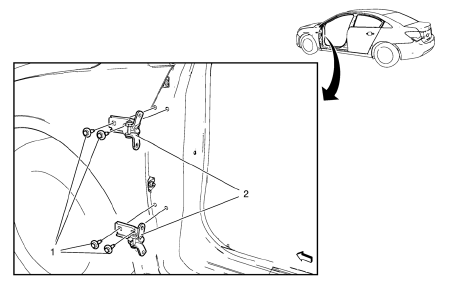
- Remove the front wheelhouse liner. Refer to Front Wheelhouse Liner Replacement.
- Remove the front fender insulator. Refer to Front Fender Insulator Replacement.
- Remove the front side door. Refer to Front Side Door Replacement.
- Front Side Door Hinge Bolt (Qty: 4)
Caution: Refer to Fastener Caution in the Preface section.
Tighten 25 N·m (19 lb ft)
- Front Side Door Hinge
Procedure
Adjust front side door as needed. Refer to Front Side Door Adjustment.
Hood Hinge Replacement

Preliminary Procedure
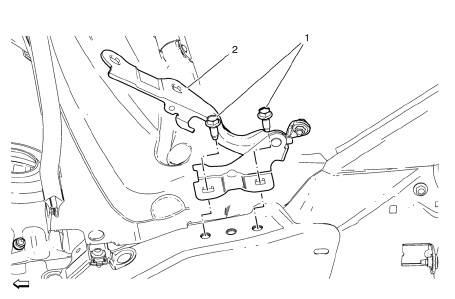
- Remove the hood. Refer to Hood Replacement.
- Remove the front fender. Refer to Front Fender Replacement.
- Hood Hinge Bolt (Qty: 2)
Caution: Refer to Fastener Caution in the Preface section.
Tighten 26 N·m (19 lb ft)
- Hood Hinge
Rear Compartment Lid Rear Hinge Replacement

Preliminary Procedure
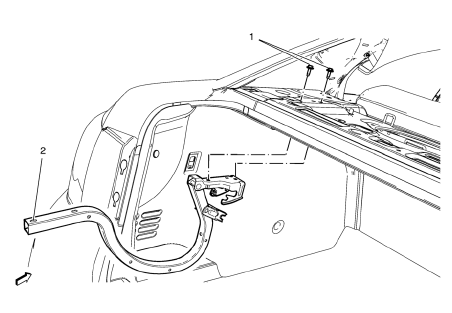
- Remove the rear compartment lid. Refer to Rear Compartment Lid Replacement
- Remove the rear window panel trim. Refer to Rear Window Panel Trim Replacement
- Rear Compartment Lid Rear Hinge Bolt (Qty: 2)
Caution: Refer to Fastener Caution in the Preface section.
Tighten 9 N·m (80 lb in)
- Rear Compartment Lid Rear Hinge
Procedure
Adjust rear compartment lid as needed. Refer to Rear Compartment Lid Adjustment
 Hood Primary Latch Release Cable Handle Replacement
Preliminary Procedure
Remove the front side door sill trim plate. Refer to Front Side Door Sill
Trim Plate Replacement.
Hood Primary Latch Release Cable Handle
Procedure
Pull down the hoo ...
 Rear Side Door Upper Hinge and Lower Hinge Replacement
Preliminary Procedure
Remove the rear side door. Refer to Rear Side Door Replacement.
Rear Side Door Hinge Bolt (Qty: 4)
Caution: Refer to Fastener Caution in the Preface section.
Tight ...
Other materials:
Steering Wheel Controls
For vehicles with audio steering wheel controls, some audio controls can be adjusted
at the steering wheel.
: For vehicles with a Bluetooth,
OnStar, or navigation system, press to interact with those systems.
: Press to silence the vehicle speakers
only. Press again to turn the sound on. ...
Tire Chains
WARNING
Do not use tire chains. There is not enough clearance. Tire chains used on
a vehicle without the proper amount of clearance can cause damage to the brakes,
suspension, or other vehicle parts. The area damaged by the tire chains could cause
loss of control and a crash. Use another type ...
Rear Compartment Lid Emblem/Nameplate Replacement (Chevrolet)
Rear Compartment Lid Emblem Assembly
Caution: Refer to Exterior Trim Emblem Removal Caution in the Preface
section.
Procedure
The part and surface should be 21°C (70°F) prior to installation. The
vehicle should remain 21°C (70°F) for
one hour after assembly to allow adhesive to deve ...
