Chevrolet Cruze Owners Manual: Heated Front Seats
WARNING
If you cannot feel temperature change or pain to the skin, the seat heater may cause burns. To reduce the risk of burns, people with such a condition should use care when using the seat heater, especially for long periods of time. Do not place anything on the seat that insulates against heat, such as a blanket, cushion, cover, or similar item. This may cause the seat heater to overheat. An overheated seat heater may cause a burn or may damage the seat
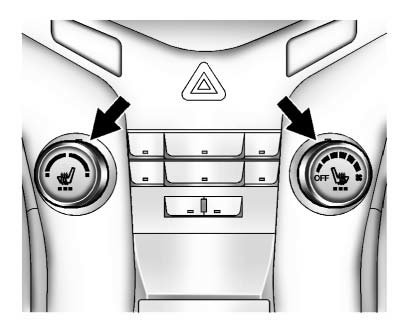
If available, the controls are on the center stack. The engine must be running to operate the heated seats.
Press  or
or
 to heat the driver or passenger seat
cushion and seatback.
to heat the driver or passenger seat
cushion and seatback.
Press the control once for the highest setting. With each press of the control, the heated seat will change to the next lower setting, and then the off setting. Three lights indicate the highest setting and one light the lowest.
The passenger seat may take longer to heat up.
Remote Start Heated Seats
When it is cold outside, the heated seats can be turned on automatically during a remote vehicle start. The heated seats will be canceled when the ignition is turned on. Press the control to use the heated seats after the vehicle is started.
The heated seat indicator lights on the control do not turn on during a remote start.
The temperature performance of an unoccupied seat may be reduced.
This is normal.
The heated seats will not turn on during a remote start unless the heated seat feature is enabled in the vehicle personalization menu.
 Reclining Seatbacks
WARNING
If either seatback is not locked, it could move forward in a sudden stop or
crash. That could cause injury to the person sitting there.
Always push and pull on the seatbacks to be sure the ...
 Rear Seats
Either side of the rear seatback can be folded.
To fold the rear seatbacks:
1. Place the front seatbacks in the upright position.
Notice: Folding a rear seat with the safety belts still fastened ma ...
Other materials:
Removal Procedure
Disable the SIR System. Refer to SIR Disabling and Enabling.
Disconnect the negative battery cable. Refer to Battery Negative Cable
Disconnection and Connection.
Remove all related panels and components.
Visually inspect the damage. Repair as much of the damage as possible.
Remove the ...
Pandora Internet Radio
Pandora® (if equipped) is a free Internet radio service that streams personalized
radio stations based on artists, songs, genres, and comedians. Create stations using
the Pandora website or smartphone application, then use
(thumbs up) or
(thumbs down) to personalize stations.
To set up an ...
Installation Procedure
Note: If the location of the original plug weld holes can
not be determined, space the plug weld holes every 40 mm (1½ in).
Drill 8 mm (5/16 in) for plug welding along the edges of the underbody
rear side rail reinforcement as noted from
the original panel.
Clean and ...
