Chevrolet Cruze Repair Manual: Headlining Trim Panel Replacement (With Sunroof)
Warning: Do not attempt to repair or alter the head impact energy-absorbing material glued to the headliner or to the garnish trims. If the material is damaged, replace the headliner and/or the garnish trim. Failure to do so could result in personal injury.
Caution: If a vehicle is equipped with a head curtain inflator module ensure that the inflator module and tether are undamaged. If tether or curtain airbag are damaged in any way, they must be replaced.
Caution: Use care when working around the head curtain inflator module. Sharp tools may puncture the curtain airbag. If the head curtain inflator module is damaged in any way, it must be replaced.
Preliminary Procedures
- Disable the SIR system. Refer to SIR Disabling and Enabling
- Remove the sunshade supports. Refer to Sunshade Support Replacement
- Remove the roof console. Refer to Roof Console Replacement
- Remove the windshield outside moisture sensor cover. Refer to Windshield Outside Moisture Sensor Cover Replacement
- Remove the assist handles. Refer to Assist Handle Replacement
- Remove the windshield garnish moldings. Refer to Windshield Garnish Molding Replacement
- Remove the center pillar upper garnish moldings. Refer to Center Pillar Upper Garnish Molding Replacement
- Remove the quarter window garnish moldings. Refer to Quarter Window Garnish Molding Replacement
- Move the front seat fully forward and recline.
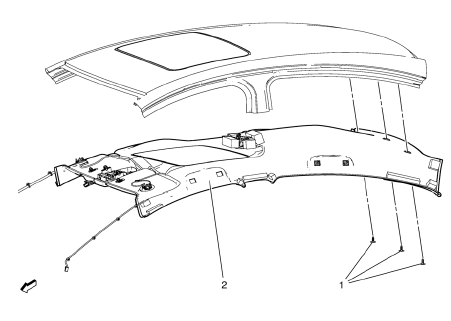
- Headliner Trim Panel Retainer (Qty: 3)
- Headliner Trim Panel Assembly
Procedure
Disconnect the electrical connectors.
 Front Floor Panel Carpet Replacement
Preliminary Procedures
Remove front seats. Refer to Driver or Passenger Seat
Replacement.
Remove rear seat. Refer to Rear Seat Replacement.
Remove the front floor console. R ...
 Headlining Trim Panel Replacement (Without Sunroof)
Warning: Do not attempt to repair or alter the head impact
energy-absorbing material glued to the headliner or to the garnish
trims. If the material is damaged, replace the headliner and/or the ...
Other materials:
Electrical System Overload
The vehicle has fuses and circuit breakers to protect against an electrical system
overload.
When the current electrical load is too heavy, the circuit breaker opens and
closes, protecting the circuit until the current load returns to normal or the problem
is fixed. This greatly reduces the c ...
Service Publications Ordering Information
Service Manuals
Service Manuals have the diagnosis and repair information on the engines, transmission,
axle, suspension, brakes, electrical, steering, body, etc.
Service Bulletins
Service Bulletins give additional technical service information needed to knowledgeably
service General Motors c ...
Removal Procedure
Warning: Refer to Approved Equipment for Collision Repair Warning in the
Preface section.
Disable the SIR System. Refer to SIR Disabling and Enabling.
Disconnect the negative battery cable. Refer to Battery Negative Cable
Disconnection and Connection.
Remove all related panels and ...
