Chevrolet Cruze Repair Manual: Installation Procedure
- Clean and prepare the attaching surfaces for welding.
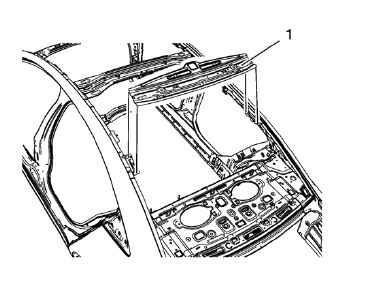
- Position the roof rear header panel (1) on the vehicle.
- Verify the fit of the panel.
- Clamp the roof rear header panel into position.
- Spot weld accordingly as noted from the original panel.
- Apply the sealers and anti-corrosion materials to the repair area, as necessary. Refer to Anti-Corrosion Treatment and Repair.
- Paint the repaired area. Refer to Basecoat/Clearcoat Paint Systems.
- Install all related panels and components.
- Connect the negative battery cable. Refer to Battery Negative Cable Disconnection and Connection.
- Enable the SIR system. Refer to SIR Disabling and Enabling.
 Removal Procedure
Warning: Refer to Approved Equipment for Collision Repair Warning in the
Preface section.
Disable the SIR System. Refer to SIR Disabling and Enabling.
Disconnect the negative battery cab ...
 Rocker Inner Panel Replacement (MAG-Welding)
Note: According to different corrosion warranties, only the
regional mandatory joining methods are allowed. ...
Other materials:
Installation Procedure
Prepare all mating surfaces as necessary
Align the body lock pillar outer panel reinforcement.
Drill 8 mm (5/16 in) for plug welding along the edges of the body lock
pillar outer panel reinforcement as noted from the original
panel.
Clean and prepare the attaching surfac ...
Front Bumper Energy Absorber Bracket Replacement
Preliminary Procedure
Remove the front bumper fascia opening cover. Refer to Front Bumper Fascia
Opening Lower Cover Replacement
Drivetrain and Front Suspension Frame Bolt Front
Caution: Refer to Fastener Caution in the Preface section.
Tighten
160 N·m (119 lb ft)
Note: Do NOT reu ...
Wheel Alignment - Steering Wheel Angle and/or Front Toe Adjustment
Ensure that the steering wheel is set in a straight ahead position.
Loosen the tie rod jam nut (1).
Adjust the toe to specification by turning the adjuster (2). Refer to
Wheel Alignment Specifications.
Caution: Refer to Fastener Caution in the Preface section.
Tighten the tie ro ...
