Chevrolet Cruze Repair Manual: Collision Repair
Specifications

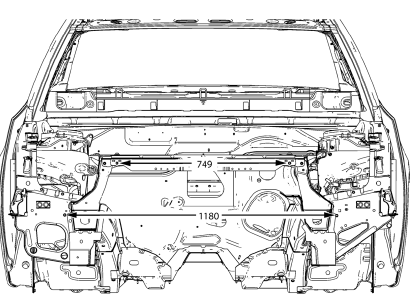
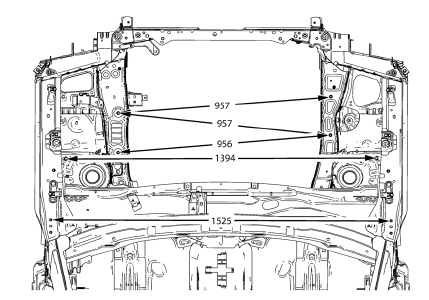
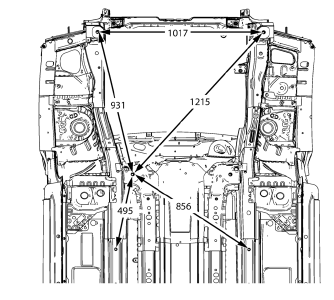
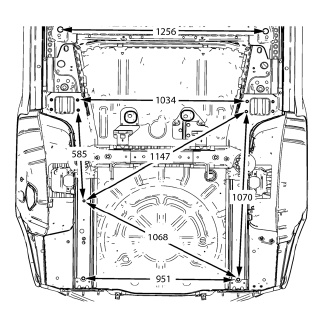
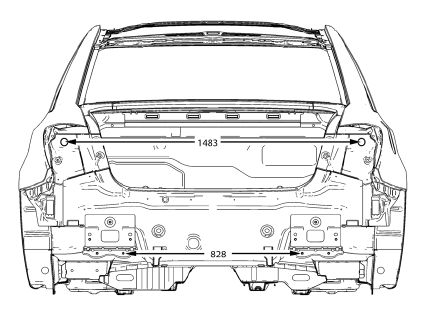
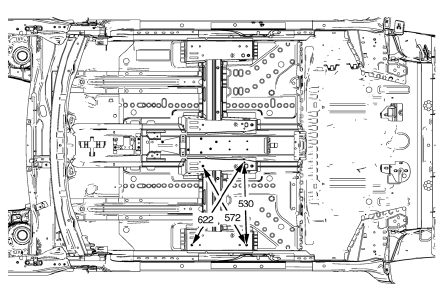
Point-to-point measurements are for reference only. All measurements are given in millimeters. Use these measurements for diagnosing and estimating. Point-to-point measurements are duplicated with tram bar pointers set at equal lengths. All die marks, holes, slots, and fasteners are measured to the center. All dimensions are symmetrical unless otherwise specified
Point-to-Point Measurements
Front End
Engine Compartment
Front End Lower
Rear End Lower
Rear End
Side

Front Seat Mounting Points
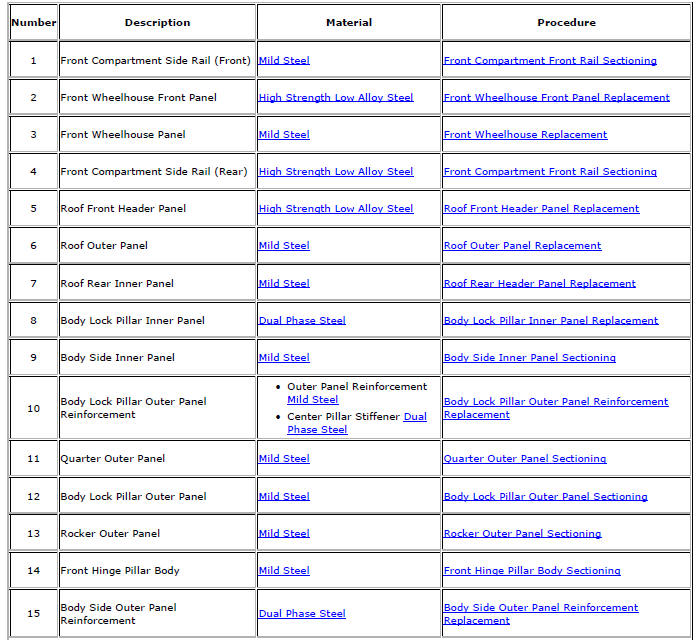
Structure Identification
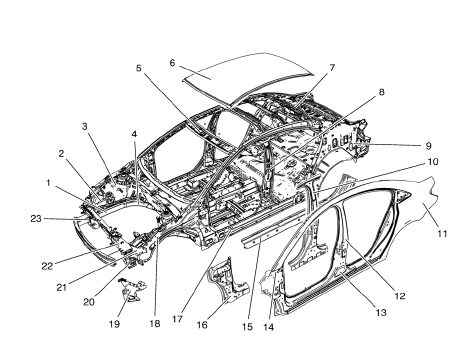
View Front
View Rear
- Overlap/Backing Plate Sectioning (Welding)
- Front Bumper Impact Bar Replacement
- Headlamp Mount Panel Replacement (MAG-Welding)
- Headlamp Mount Panel Replacement (MIG-Brazing)
- Front End Upper Tie Bar Support Sectioning (MAG Welding)
- Front End Upper Tie Bar Support Sectioning (MIG Brazing)
- Front End Upper Tie Bar Replacement (MAG-Welding)
- Front End Upper Tie Bar Replacement (MIG-Brazing)
- Drivetrain and Front Suspension Frame Front Support Replacement (MAG-Welding)
- Drivetrain and Front Suspension Frame Front Support Replacement (MIG-Brazing)
- Front Wheelhouse Front Panel Replacement (MAG-Welding)
- Front Wheelhouse Front Panel Replacement (MIG-Brazing)
- Front Wheelhouse Panel Replacement (MAG-Welding)
- Front Wheelhouse Panel Replacement (MIG-Brazing)
- Front Wheelhouse Panel Rear Reinforcement Replacement (MAG-Welding)
- Front Wheelhouse Panel Rear Reinforcement Replacement (MIG-Brazing)
- Front Compartment Upper Side Rail Replacement (MAG-Welding)
- Front Compartment Upper Side Rail Replacement (MIG-Brazing)
- Front Compartment Upper Side Rail Sectioning (MAG-Welding)
- Front Compartment Upper Side Rail Sectioning (MIG-Brazing)
- Front Compartment Side Rail Sectioning (Long, MAG-Welding)
- Front Compartment Side Rail Sectioning (Long, MIG-Brazing)
- Front Compartment Side Rail Sectioning (Short, MAG-Welding)
- Front Compartment Side Rail Sectioning (Short, MIG-Brazing)
- Front Hinge Pillar Body Sectioning (MAG-Welding)
- Front Hinge Pillar Body Sectioning (MIG-Brazing)
- Body Hinge Pillar Lower Reinforcement Replacement (MAG-Welding)
- Body Hinge Pillar Lower Reinforcement Replacement (MIG-Brazing)
- Roof Outer Panel Replacement (MAG-Welding)
- Roof Outer Panel Replacement (MIG-Brazing)
- Roof Front Header Panel Replacement (MAG-Welding)
- Roof Front Header Panel Replacement (MIG-Brazing)
- Roof Rear Header Panel Replacement (MAG-Welding)
- Roof Rear Header Panel Replacement (MIG-Brazing)
- Rocker Inner Panel Replacement (MAG-Welding)
- Rocker Inner Panel Replacement (MIG-Brazing)
- Body Lock Pillar Outer Panel Sectioning (MAG-Welding)
- Body Lock Pillar Outer Panel Sectioning (MIG-Brazing)
- Body Lock Pillar Outer Panel Reinforcement Replacement (MAG-Welding)
- Body Lock Pillar Outer Panel Reinforcement Replacement (MIG-Brazing)
- Body Lock Pillar Inner Panel Replacement (MAG-Welding)
- Body Lock Pillar Inner Panel Replacement (MIG-Brazing)
- Rocker Outer Panel Sectioning (MAG-Welding)
- Rocker Outer Panel Sectioning (MIG-Brazing)
- Body Side Outer Panel Reinforcement Replacement (MAG-Welding)
- Body Side Outer Panel Reinforcement Replacement (MIG-Brazing)
- Body Side Inner Panel Sectioning (MAG-Welding)
- Body Side Inner Panel Sectioning (MIG-Brazing)
- Body Side Outer Lower Panel Replacement (MAG-Welding)
- Body Side Outer Lower Panel Replacement (MIG-Brazing)
- Rear Compartment Floor Panel Sectioning (MAG-Welding)
- Rear Compartment Floor Panel Sectioning (MIG-Brazing)
- Rear Wheelhouse Panel Replacement (MAG-Welding)
- Rear Wheelhouse Panel Replacement (MIG-Brazing)
- Quarter Outer Panel Sectioning (MAG-Welding)
- Quarter Outer Panel Sectioning (MIG-Brazing)
- Body Rear End Panel Replacement (MAG-Welding)
- Body Rear End Panel Replacement (MIG-Brazing)
- Rear Bumper Impact Bar Stud Plate Replacement (MAG-Welding)
- Rear Bumper Impact Bar Stud Plate Replacement (MIG-Brazing)
- Front Side Door Outer Panel Replacement (MAG-Welding)
- Front Side Door Outer Panel Replacement (MIG-Brazing)
- Rear Side Door Outer Panel Replacement (MAG-Welding)
- Rear Side Door Outer Panel Replacement (MIG-Brazing)
- Rear Rail Sectioning (MAG-Welding)
- Rear Rail Sectioning (MIG-Brazing)
- Underbody Rear Side Rail Reinforcement Replacement (MAG-Welding)
- Underbody Rear Side Rail Reinforcement Replacement (MIG-Brazing)
- Rear Floor Panel Filler Replacement (MAG-Welding)
- Rear Floor Panel Filler Replacement (MIG-Brazing)
- Tail Lamp Pocket Replacement (MAG-Welding)
- Tail Lamp Pocket Replacement (MIG-Brazing)
- Dual Phase Steel
- High Strength Low Alloy Steel
- Mild Steel
- Ultra High Strength Dual Phase Steel
 Rear Bumper Impact Bar Replacement
Preliminary Procedure
Remove the rear bumper fascia. Refer to Rear Bumper Fascia Replacement.
Rear Bumper Energy Absorber Nut (Qty: 6)
Caution: Refer to Fastener Caution in the Preface sec ...
 Overlap/Backing Plate Sectioning (Welding)
Warning: Refer to Approved Equipment for Collision Repair Warning in
the Preface section.
Fit the service panel to the vehicle to ensure a proper fit.
Measure and mark a line at th ...
Other materials:
Removal Procedure
Raise and support the vehicle. Refer to Lifting and Jacking the Vehicle.
Remove the brake rotor. Refer to Front Brake Rotor Replacement.
Remove the wheel speed sensor screw (2).
Remove the wheel speed sensor (1) from the steering knuckle.
Remove the wheel drive shaft from the fron ...
Rear Window Defogger Description and Operation
Rear Window Defogger System Components
The rear window defogger system consists of the following components:
HVAC Control Module
HVAC Control Head
Rear Window Defogger Relay
Rear Defogger Grid
F28UA 40A Fuse
Rear Window Defogger Operation
The rear defog control system utilizes a sin ...
Installation Procedure
Align the rocker inner panel.
Drill 8 mm (5/16 in) for plug welding along the edges of the quarter
outer panel as noted from the original panel.
Clean and prepare the attaching surfaces for welding.
Position the rocker inner panel on the vehicle.
Verify the fit of ...
