Chevrolet Cruze Repair Manual: Installation Procedure
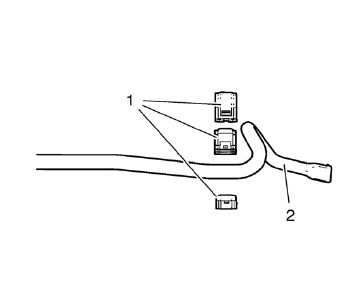
- Install NEW stabilizer shaft insulators (1) to stabilizer shaft (2) so that the slit in the insulator is facing the rear of the vehicle.
- Install the insulator c 2. lamp to the insulator:
2.1. Position the clamp (2) over on the insulator.
2.2. Use two M8 bolts (1, 3) with 40 mm (1.57 in) length.
2.3. Tighten bolts (1, 3) by turns until clamp (2) slips over insulator.
- Check proper fitting of clamp and insulator.
Retainer (1) MUST seat centrically in the hole of the clamp.
Caution: Refer to Fastener Caution in the Preface section.

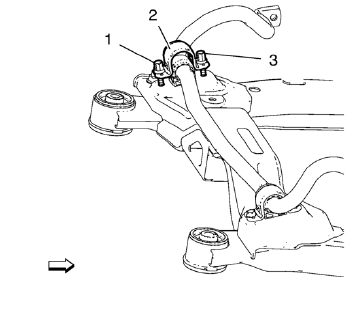
- Install the NEW stabilizer shaft bolts (1) and tighten the NEW stabilizer shaft bolts to 22 N·m (17 lb ft) + 40° using the EN 45059 kit .
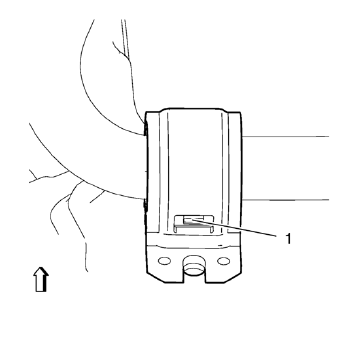
- Move out positioning pins (1) of CH 49289 adapter .
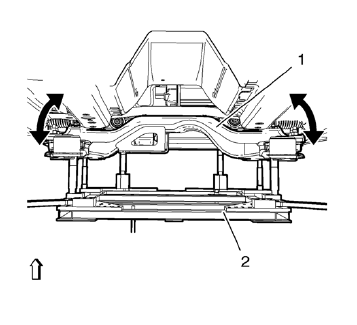
- Carefully, raise the frame (1) using CH 49289 adapter (2).

Note: Do NOT reuse old bolts.
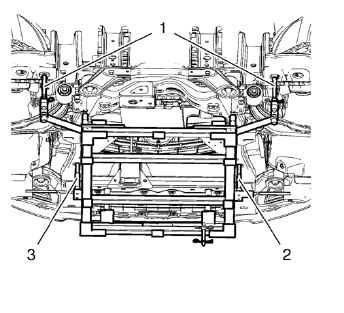
- Install the 2 frame reinforcements (1).
- Install the 2 NEW frame rear bolts (2) and tighten to 160 N·m (118 lb ft).
- Install the front transmission mount bolt (1) and tighten to 58 N·m (43 lb ft).
- Install the rear transmission mount bracket bolt (2) and tighten to 100 N·m (74 lb ft).
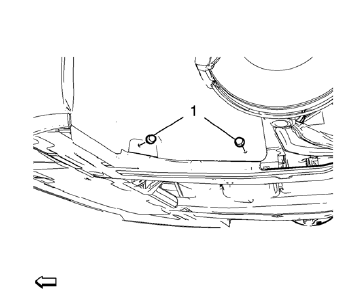
- Install and tighten 4 fasteners (1) to the engine side cover on both sides.

- Install and tighten lower stabilizer link shaft nut (2) on both sides to 35 N·m (26 lb ft)
- Lower the vehicle.
- Install the front tire and wheel assemblies. Refer to Tire and Wheel Removal and Installation
 Removal Procedure
Turn the front wheels to the straight forward position and secure the
steering wheel from moving.
Remove the 2 lower steering intermediate shaft bolts (1).
Remove the steering ...
 Front Wheel Bearing and Hub Replacement
Special Tools
EN-45059 Torque Angle Sensor Kit
For equivalent regional tools, refer to Special Tools. ...
Other materials:
Removal Procedure
Warning: Refer to Approved Equipment for Collision Repair Warning in
the Preface section.
Disable the SIR System. Refer to SIR Disabling
and Enabling.
Disconnect the negative battery cable. Refer to Battery Negative Cable
Disconnection and Connection.
Remove all related panels ...
Rear Side Door Check Replacement
Preliminary Procedure
Remove rear side door trim panel. Refer to Rear Side Door
Trim Replacement
Remove the rear side door water deflector. Refer to Rear Side Door Water
Deflector Replacement
Rear Side Door Check Bolt
Caution: Refer to Fastener Caution in the Pre ...
Power Windows
WARNING
Children could be seriously injured or killed if caught in the path of a closing
window. Never leave keys in a vehicle with children. When there are children in
the rear seat, use the window lockout button to prevent operation of the windows.
Press the switch down to open the window. ...
