
Chevrolet Cruze Repair Manual: Rear Side Door Replacement
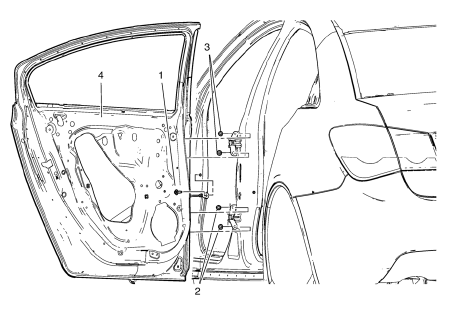
Preliminary Procedure
- Remove the rear side door trim panel. Refer to Rear Side Door Trim Replacement.
Rear Side Door Check Link Bolt Caution: Refer to Fastener Caution in the Preface section.
Procedure
- Remove the water deflector
- Disconnect the door electrical connector.
- Support the door before removing the hinge bolts
- With the aid of an assistant, remove the door.
Tighten 25 N·m (18 lb ft)
- Rear Side Door Lower Hinge Bolt (Qty: 2)
Tighten 25 N·m (18 lb ft)
- Rear Side Door Upper Hinge Bolt (Qty: 2)
Tighten 25 N·m (18 lb ft)
- Rear Side Door
Procedure
- Transfer all of the internal components.
- Adjust the rear side door as needed. Refer to Rear Side Door Adjustment.
 Rear Side Door Adjustment
Rear Side Door
Caution: Refer to Fastener Caution in the Preface section.
Procedure
Loosen the rear door hinge bolt (Qty: 4) to adjust the rear door.
Adjust the rear door in order to ...
 Front Fender Replacement
Preliminary Procedure
Remove the front bumper fascia. Refer to Front Bumper Fascia
Replacement
Remove front bumper fascia guide. Refer to Front Bumper Fascia
Replacement
Remove ...
Other materials:
Wheel Replacement
Replace any wheel that is bent, cracked, or badly rusted or corroded. If wheel
nuts keep coming loose, the wheel, wheel bolts, and wheel nuts should be replaced.
If the wheel leaks air, replace it.
Some aluminum wheels can be repaired. See your dealer if any of these conditions
exist.
Your de ...
Removal Procedure
Warning: Refer to Approved Equipment for Collision Repair Warning in the
Preface section.
Warning: Refer to Glass and Sheet Metal Handling Warning in the Preface section.
Disable the SIR System. Refer to SIR Disabling and Enabling.
Disconnect the negative battery cable. Refer to Bat ...
Floor Carpet Drying
If the carpet or the pad or insulator is wet, use the following criteria for
drying or for replacing the components:
For a 1-piece carpet assembly bonded to a cotton or a fiber padding,
replace the entire assembly
For a 2-piece carpet assembly with a cotton or a fiber padding, replace
...
