Chevrolet Cruze Repair Manual: Removal Procedure
Warning: Refer to Approved Equipment for Collision Repair Warning in the Preface section.
Warning: Refer to Collision Sectioning Warning in the Preface section.
Warning: Refer to Glass and Sheet Metal Handling Warning in the Preface section.
- Disable the SIR System. Refer to SIR Disabling and Enabling.
- Disconnect the negative battery cable. Refer to Battery Negative Cable Disconnection and Connection.
- Remove all related panels and components.
- Visually inspect the damage. Repair as much of the damage as possible.
- Remove the sealers and anti-corrosion materials from the repair area, as necessary. Refer to Anti-Corrosion Treatment and Repair.
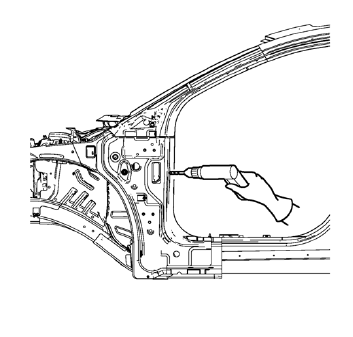
- Locate and mark all the necessary factory welds of the front hinge pillar body.
- Drill all factory welds. Note the number and location of welds for installation of the service assembly.
- Remove the damaged front hinge pillar body reinforcement.
 Body Hinge Pillar Lower Reinforcement Replacement (MAG-Welding)
Note: According to different corrosion warranties, only the
regional mandatory joining methods are allowed. ...
 Installation Procedure
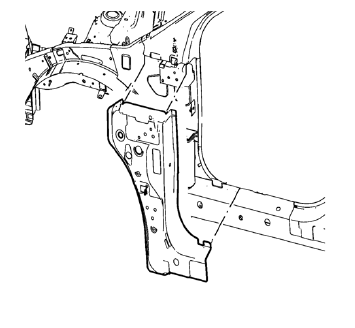
Prepare all mating surfaces as necessary.
Align the front hinge pillar body reinforcement.
Drill 8 mm (5/16 in) for plug welding along the edges of the front hinge
pillar body as not ...
Other materials:
Removal Procedure
Warning: Refer to Approved Equipment for Collision Repair Warning in the
Preface section.
Warning: Refer to Glass and Sheet Metal Handling Warning in the Preface section.
Disable the SIR System. Refer to SIR Disabling and Enabling.
Disconnect the negative battery cable. Refer to Battery N ...
Tire Sealant and Compressor Kit
WARNING
Idling a vehicle in an enclosed area with poor ventilation is dangerous. Engine
exhaust may enter the vehicle. Engine exhaust contains carbon monoxide (CO) which
cannot be seen or smelled.
It can cause unconsciousness and even death. Never run the engine in an enclosed
area that has ...
What Will You See after an Airbag Inflates?
After the frontal airbags and seat-mounted side impact airbags inflate, they
quickly deflate, so quickly that some people may not even realize an airbag inflated.
Roof-rail airbags may still be at least partially inflated for some time after
they inflate. Some components of the airbag module ma ...
