Chevrolet Cruze Repair Manual: Wheel Stud Replacement
Removal Procedure
- Raise and suitably support the vehicle. Refer to Lifting and Jacking the Vehicle.
- Remove the tire and wheel assembly. Refer to Tire and Wheel Removal and Installation.
- Remove the wheel bearing/hub. Refer to Rear Wheel Bearing and Hub Replacement.
Caution: Support the brake caliper with heavy mechanic wire, or equivalent, whenever it is separated from its mount and the hydraulic flexible brake hose is still connected. Failure to support the caliper in this manner will cause the flexible brake hose to bear the weight of the caliper, which may cause damage to the brake hose and in turn may cause a brake fluid leak.
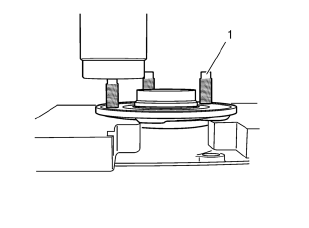
- Release the wheel stud (1) from the bearing hub with the hydraulic press and discard the stud.
Installation Procedure
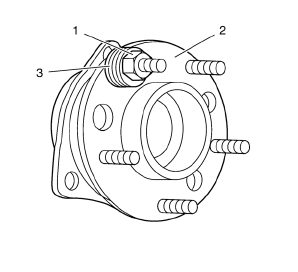
- Install a NEW stud into the bearing/hub assembly (2). Add enough washers (3) in order to draw the stud into the hub.
- Install and tighten a wheel nut (1) until the head of the wheel stud is fully seated against the back of the bearing/hub flange (2).
- Remove the wheel nut (1) and the washers (3).
- Install the wheel bearing/hub (2). Refer to Rear Wheel Bearing and Hub Replacement.
- Install the tire and wheel assembly. Refer to Tire and Wheel Removal and Installation.
- Remove the support and lower the vehicle.
 Rear Axle Replacement
Special Tools
EN 45059 Torque Angle Sensor Kit
For equivalent regional tools, refer to Special Tools.
Removal Procedure
Raise and suitably support the vehicle. Refer to Lifting and ...
 Rear Suspension Description and Operation
This vehicle has a semi-independent twist-beam rear suspension system
consisting of the following components:
An axle with integral trailing arms
AV shaped twisting cross beam
Two coil sprin ...
Other materials:
Front Bumper Impact Bar Replacement
Removal Procedure
Warning: Refer to Approved Equipment for Collision Repair Warning in the
Preface section.
Warning: Refer to Glass and Sheet Metal Handling Warning in the Preface section.
Disable the SIR System. Refer to SIR Disabling and Enabling.
Disconnect the negative battery ...
Removal Procedure
Warning: Refer to Approved Equipment for Collision Repair Warning in
the Preface section.
Warning: Refer to Glass and Sheet Metal Handling Warning in the Preface
section.
Disable the SIR System. Refer to SIR Disabling and Enabling.
Disconnect the negative battery cable. Refer to Bat ...
Rear Suspension
Specifications
Rear Suspension Components
Rear Shock Absorber Upper Mount
Rear Shock Absorber Upper Mount
Rear Shock Absorber Upper Mount
Rear Shock Absorber Upper Mount
Shock Absorber Assembly
Upper Dumping Ring
Rear Spring
Lower Dumping Ring
Rear Axle Bushing
Rear Ax ...
