
Chevrolet Cruze Repair Manual: Front Bumper Fascia Guide Replacement
Preliminary Procedure
Remove the front bumper fascia. Refer to Front Bumper Fascia Replacement.
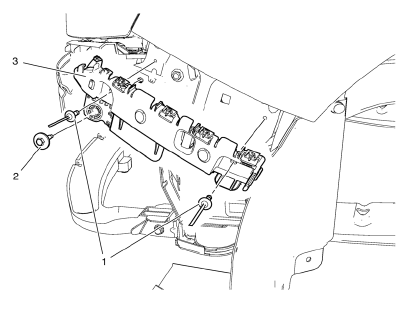
- Front Bumper Fascia Guide Rivet (Qty: 2)
- Headlamp Bolt
Caution: Refer to Fastener Caution in the Preface section.
Tighten 2.5 N·m (23 lb in)
- Front Bumper Fascia Guide
Front Bumper Fascia Opening Lower Cover Replacement
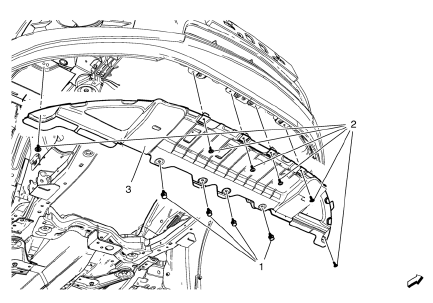
- Front Bumper Fascia Opening Lower Cover Retainer (Qty: 4)
- Front Bumper Fascia Opening Lower Cover Bolt (Qty: 6)
Caution: Refer to Fastener Caution in the Preface section.
Tighten 2.5 N·m (23 lb in)
- Front Bumper Fascia Opening Lower Cover
Front Bumper Fascia Lower Stiffener Replacement
Preliminary Procedure
Remove the front bumper fascia. Refer to Front Bumper Fascia Replacement.
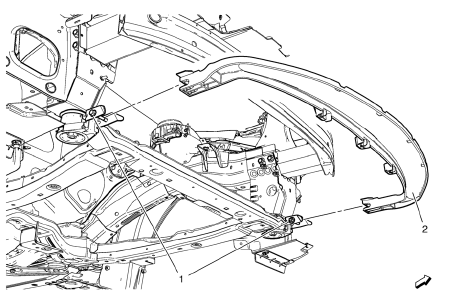
- Front Bumper Fascia Lower Stiffener Bracket Bolt (Qty: 2)
Caution: Refer to Fastener Caution in the Preface section.
Tighten 22 N·m (17 lb ft)
- Front Bumper Fascia Lower Stiffener
Front Bumper Fascia Air Deflector Replacement
Preliminary Procedure
Remove the front bumper fascia opening lower cover. Refer to Front Bumper Fascia Opening Lower Cover Replacement.
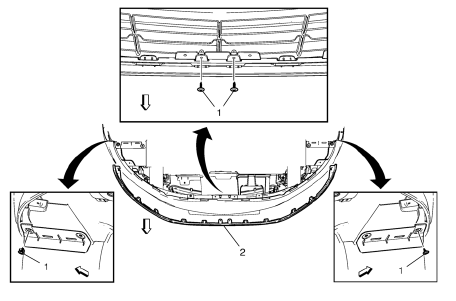
- Front Bumper Fascia Air Deflector Bolt (Qty: 4)
Caution: Refer to Fastener Caution in the Preface section.
Tighten 2.5 N·m (23 lb in)
- Front Bumper Fascia Air Deflector
Procedure
Unclip from front bumper fascia.
 Front Bumper Fascia Replacement
Preliminary Procedure
Remove the front bumper fascia opening cover. Refer to Front Bumper Fascia
Opening Lower Cover Replacement.
Front Wheelhouse Liner Bolt (Qty: 8)
Caution: Refer to Fa ...
 Rear Bumper Fascia Replacement
Preliminary Procedure
Remove the tail lamps. Refer to Tail Lamp Replacement.
Rear Bumper Fascia Retainer (Qty: 2)
Rear Wheelhouse Liner Bolt (Qty: 6)
Caution: Refer to Fastener Caution in ...
Other materials:
Installation Procedure
Cut the roof front header panel in corresponding locations to fit the
remaining original panel. The sectioning joint should be trimmed
to allow a gap of one-and-one-half-times the metal thickness at the
sectioning joint.
Create a 50 mm (2 in) backing plate from the unused portion of ...
Exterior Lighting
The exterior lamp control is to the left of the steering column on the instrument
panel.
: Briefly turn to this position
to turn the automatic lamp control off or on again.
AUTO: Turns the headlamps on automatically at normal brightness, together with
the parking lamps, taillamps, license ...
Inflatable Restraint Steering Wheel Module Coil Centering
Caution: The new SIR coil assembly will be centered. Improper
alignment of the SIR coil assembly may damage the unit, causing an
inflatable restraint malfunction.
Verify the following conditions before centering the supplemental
inflatable restraint (SIR) steering wheel module co ...
