
Chevrolet Cruze Repair Manual: Generator Air Conditioning Compressor,Power Steering Pump Belt Replacement
Removal Procedure
- Raise the vehicle full height. Refer to Lifting and Jacking the Vehicle.
- Remove the front compartment splash shield. Refer to Front Compartment Splash Shield Replacement.
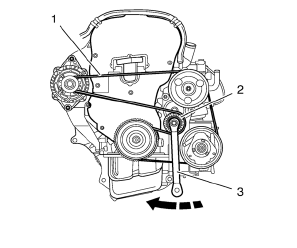
- Rotate the drive belt tensioner bolt (2) clockwise.
- Remove the drive belt (1) while pulling the drive belt tensioner by a suitable tool (3).
Installation Procedure
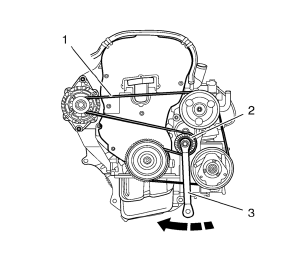
- Rotate the drive belt tensioner bolt (2) clockwise.
- Install the drive belt (1) while pulling the tensioner by a suitable tool (3).
- Rotate the tensioner counterclockwise to tension the belt drive belt (2)
- Install the front compartment splash shield. Refer to Front Compartment Splash Shield Replacement.
- Lower the vehicle full height. Refer to Lifting and Jacking the Vehicle.
Engine Mount Replacement
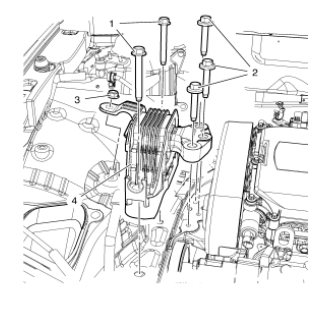
Preliminary Procedures
- Remove the air cleaner assembly. Refer to Air Cleaner Assembly Replacement.
- Support the engine. Install a suitable engine lifting device. Install a suitable cable at the 3 engine lift brackets and at the engine lifting device.
- Engine Mount Bolt (Qty: 2)
Caution: Refer to Fastener Caution in the Preface section.
Tighten 62 N·m (46 lb ft)
- Engine Mount Bracket Bolt (Qty: 3)
Note: Use only NEW bolts.
Tighten 50 N·m + 60°-75° (37 lb ft + 60°-75°)
- Engine Mount Nut
Tighten 62 N·m (46 lb ft)
- Engine Mount
Heater and Air Conditioning Control Replacement
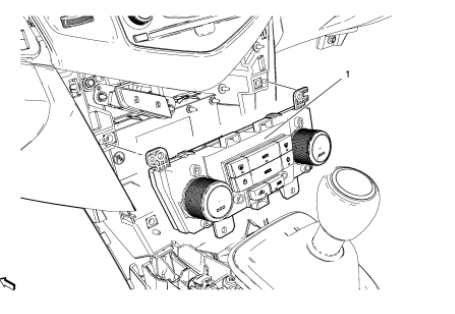
Preliminary Procedures
Remove instrument panel accessory bezel. Refer to Instrument Panel Accessory Bezel Replacement.
- Heater and Air Conditioning Control
 Drive Belt Replacement
Special Tools
EN 6349 Locking Pin
For equivalent regional tools, refer to Special Tools.
Removal Procedure
Open the hood.
Remove the power steering pump belt. Refer to Power Steering Pump Bel ...
 News
...
Other materials:
Installation Procedure
Note: If the location of the original plug weld holes can not be
determined, space the plug weld holes every 40 mm (1½ in).
Drill 8 mm (5/16 in) for plug welding along the edges of the rear floor
panel filler as noted from the original
panel.
Clean and prepare the atta ...
Brake System Warning Light
The vehicle brake system consists of two hydraulic circuits. If one circuit is
not working, the remaining circuit can still work to stop the vehicle. For normal
braking performance, both circuits need to be working.
If the warning light comes on, there is a brake problem. Have the brake system ...
Battery Voltage and Charging Messages
BATTERY SAVER ACTIVE
This message displays when the vehicle has detected that the battery voltage
is dropping beyond a reasonable point. The battery saver system starts reducing
features of the vehicle that may be noticed. At the point that features are disabled,
this message displays. Turn o ...
