Chevrolet Cruze Repair Manual: Drive Belt Replacement
Special Tools
EN 6349 Locking Pin
For equivalent regional tools, refer to Special Tools.
Removal Procedure
- Open the hood.
- Remove the power steering pump belt. Refer to Power Steering Pump Belt Replacement.
- Raise the vehicle by its full height. Refer to Lifting and Jacking the Vehicle.
- Remove the front compartment splash shield. Refer to Front Compartment Splash Shield Replacement.
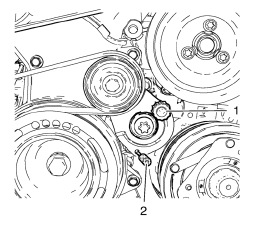
- Release tension to the drive belt tensioner counterclockwise (1) and lock with EN 6349 pin (2).
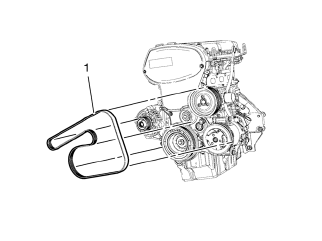
- Remove the drive belt (1).
Installation Procedure
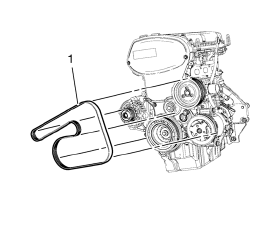
- Install the drive belt (1).
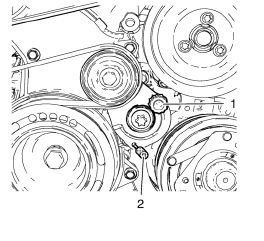
- Release tension to the tensioner at projection (1) counterclockwise.
Note: Allow tensioner to slide back slowly.
- Remove EN 6349 pin (2).
- Apply tension to the tensioner at projection (1) clockwise.
- Install the front compartment splash shield. Refer to Front Compartment Splash Shield Replacement.
- Lower the vehicle by its full height.
- Install the power steering pump belt. Refer to Power Steering Pump Belt Replacement.
- Close the hood.
 Brake Drum Replacement
Special Tools
CH 41013 Rotor Resurfacing Kit
CH 42450-A Wheel Hub Resurfacing Kit
For equivalent regional tools, refer to Special Tools.
Removal Procedure
Warning: Refer to Brake Dust Warni ...
 Generator Air Conditioning Compressor,Power Steering Pump Belt Replacement
Removal Procedure
Raise the vehicle full height. Refer to Lifting and Jacking the Vehicle.
Remove the front compartment splash shield. Refer to Front Compartment
Splash Shield Replacement.
...
Other materials:
Instrument Panel Cluster Lower Trim Plate Replacement
Preliminary Procedure
Remove instrument panel cluster trim plate. Refer to Instrument Panel Cluster
Trim Plate Replacement.
Instrument Panel Cluster Lower Trim Plate Screw (Qty: 4)
Caution: Refer to Fastener Caution in the Preface section.
Tighten
2.5 N·m (23 lb in)
Instrument Pa ...
Seat Heating and Cooling
Specifications
Heated/Cooled Seat Schematics
Front Seat Heater Control Module Replacement
Preliminary Procedure
Driver or passenger seat replacement. Refer to Driver or Passenger Seat
Replacement.
Front Seat Heater Control Module Bolt (Qty: 2)
Caution: Refer to Fastener Cauti ...
Front Brake Rotor Replacement
Special Tools
CH-41013 Rotor Resurfacing Kit
CH-42450-A Wheel Hub Resurfacing Kit
For equivalent regional tools, refer to Special Tools.
Removal Procedure
Warning: Refer to Brake Dust Warning in the Preface section.
Raise and support the vehicle. Refer to Lifting and Jacking ...
