Chevrolet Cruze Repair Manual: Brake Drum Replacement
Special Tools
- CH 41013 Rotor Resurfacing Kit
- CH 42450-A Wheel Hub Resurfacing Kit
For equivalent regional tools, refer to Special Tools.
Removal Procedure
Warning: Refer to Brake Dust Warning in the Preface section.
- Check to ensure that the park brake is fully released
- Raise and support the vehicle. Refer to Lifting and Jacking the Vehicle.
- Remove the rear tire and wheel assembly. Refer to Tire and Wheel Removal and Installation.
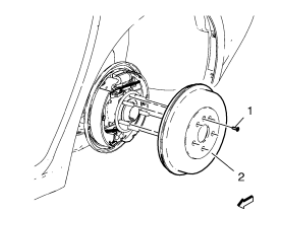
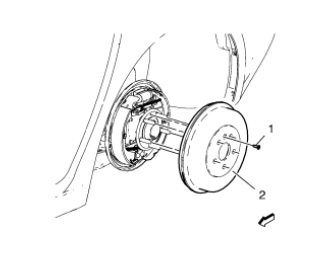
- Remove the brake drum screw (1).
- Remove the brake drum (2).
- If the brake drum is to be reinstalled to the vehicle, use the CH 41013
resurfacer or equivalent to clean any rust or corrosion from
the hub/flange mating surface of the brake drum (2).
To clean any rust or corrosion from the hub/flange mating surface of the brake drum (2).
- Use the CH 42450-A resurfacer or equivalent to clean the wheel hub flange.
Installation Procedure
- If installing a new brake drum (2), use denatured alcohol or an equivalent approve brake cleaner and a clean shop towel to remove the protective coating from the friction surface of the drum.
- Adjust the drum brakes. Refer to Drum Brake Adjustment.
- Install the drum brake.
Caution: Refer to Fastener Caution in the Preface section.
- Install drum brake screw (1) and tighten to 7 N·m (62 lb in).
- Install the tire and wheel assembly. Refer to Tire and Wheel Removal and Installation.
- Lower the vehicle.
- Apply the brakes approximately three times in order to seat and center the brake shoes within the drum.
 Rear Brake Rotor Replacement
Special Tools
CH 41013 Rotor Resurfacing Kit
CH 42450-A Wheel Hub Resurfacing Kit
For equivalent regional tools, refer to Special Tools.
Removal Procedure
Warning: Refer to Brake Dust Warni ...
 Drive Belt Replacement
Special Tools
EN 6349 Locking Pin
For equivalent regional tools, refer to Special Tools.
Removal Procedure
Open the hood.
Remove the power steering pump belt. Refer to Power Steering Pump Bel ...
Other materials:
Removal Procedure
Warning: Refer to Approved Equipment for Collision Repair Warning in the
Preface section.
Warning: Refer to Collision Sectioning Warning in the Preface section.
Warning: Refer to Glass and Sheet Metal Handling Warning in the Preface section.
Disable the SIR System. Refer to SIR Dis ...
Front Bumper Fascia Guide Replacement
Preliminary Procedure
Remove the front bumper fascia. Refer to Front Bumper Fascia Replacement.
Front Bumper Fascia Guide Rivet (Qty: 2)
Headlamp Bolt
Caution: Refer to Fastener Caution in the Preface section.
Tighten
2.5 N·m (23 lb in)
Front Bumper Fascia Guide
Front Bumper ...
Vehicle Positioning
At times, the position of the vehicle on the map could be inaccurate due to one
or more of the following reasons:
• The road system has changed.
• The vehicle is driving on slippery road surfaces such as sand, gravel, or snow.
• The vehicle is traveling on winding roads or long straight roads.
...
