Chevrolet Cruze Repair Manual: Thread Repair
General purpose thread repair kits are available commercially.
Warning: Refer to Safety Glasses Warning in the Preface section.
Note: Refer to the thread repair kit manufacturer's instructions regarding the size of the drill and which tap to use.
Always avoid any buildup of chips. Back out the tap every few turns and remove the chips.
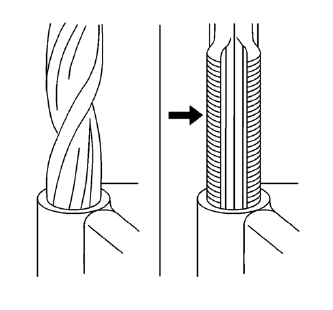
- Determine the size, the pitch, and the depth of the damaged thread.
- Adjust the stop collars on the cutting tool as needed. Tap the stop collars to the required depth.
- Drill out the damaged thread.
- Remove the chips.
- Apply clean engine oil to the top thread.
- Use the tap in order to cut new thread.
- Clean the thread.
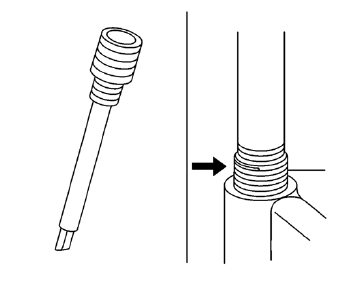
- Screw the thread insert onto the mandrel of the thread insert installer. Engage the tang of the thread insert onto the end of the mandrel.
Note: The thread insert should be flush to 1 turn below the surface.
- Lubricate the thread insert with clean engine oil - except when installing in aluminum - and install the thread insert.
- If the tang of the thread insert does not break off when backing out the thread insert installer, break off the tang using a drift punch.
Special Tools and Equipment
 Rear Seat Back Cushion Cover and Pad Replacement - Left Side
Preliminary Procedure
Remove rear seat - left side. Refer to Rear Seat Replacement
Rear Seat Back Cushion Cover
Procedure
Remove the staples from the seat back cover.
Remove seat ba ...
 Seat Heating and Cooling
Specifications
Heated/Cooled Seat Schematics
Front Seat Heater Control Module Replacement
Preliminary Procedure
Driver or passenger seat replacement. Refer to Driver or Passenger S ...
Other materials:
Removal Procedure
Warning: Refer to Glass and Sheet Metal Handling Warning in the Preface
section.
Disable the SIR System. Refer to SIR Disabling
and Enabling.
Disconnect the negative battery cable. Refer to Battery Negative Cable
Disconnection and Connection.
Remove the front side door. Refer to Fron ...
Accessories and Modifications
Adding non‐dealer accessories or making modifications to the vehicle can affect
vehicle performance and safety, including such things as airbags, braking, stability,
ride and handling, emissions systems, aerodynamics, durability, and electronic systems
like antilock brakes, traction cont ...
Fuel Gauge
When the ignition is on, the fuel gauge indicates about how much fuel is left
in the tank.
An arrow on the fuel gauge indicates the side of the vehicle the fuel door is
on.
A FUEL LEVEL LOW message may appear in the Driver Information Center (DIC) and
a single chime sounds.
Here are four ...
