Chevrolet Cruze Repair Manual: Installation Procedure

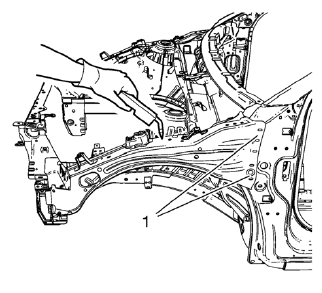
- Create 5 x 18 mm (4/16 x 11/16 in) slots for MIG-brazing (1).
- Clean and prepare the attaching surfaces for spot welding and brazing.
Note: In MIG-brazing areas 50 mm (2 in) must be kept clear of structural adhesive.
- Apply structural adhesive to all attaching surfaces.
- Position the front compartment upper side rail on the vehicle.
- Verify the fit of the front compartment upper side rail.
- Clamp the front compartment upper side rail into position.
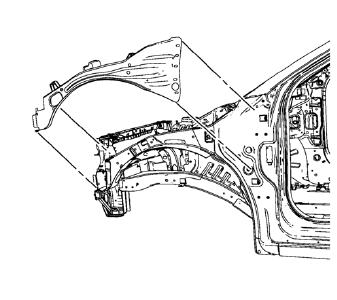
Note: MIG-braze factory slots in the front hinge pillar body area (1) as noted from the original panel.
- Braze accordingly.

- Spot weld accordingly.
- Apply the sealers and anti-corrosion materials to the repair area, as necessary. Refer to Anti-Corrosion Treatment and Repair.
- Paint the repaired area. Refer to Basecoat/Clearcoat Paint Systems.
- Install all related panels and components.
- Connect the negative battery cable. Refer to Battery Negative Cable Disconnection and Connection.
- Enable the SIR system. Refer to SIR Disabling and Enabling.
 Removal Procedure
Warning: Refer to Approved Equipment for Collision Repair Warning in the
Preface section.
Warning: Refer to Glass and Sheet Metal Handling Warning in the Preface section.
Disable the SIR Syst ...
 Front Compartment Upper Side Rail Sectioning (MAG-Welding)
Note: According to different corrosion warranties, only the
regional mandatory joining methods are allowed. ...
Other materials:
Hood Primary Latch Release Cable Replacement
Preliminary Procedure
Remove hood primary latch release cable handle. Refer to Hood Primary
Latch Release Cable Handle Replacement.
Remove the front bumper fascia. Refer to Front Bumper Fascia Replacement
Remove the radiator grille support. Refer to Radiator Grille
Reinforcem ...
Fuses and Circuit Breakers
The wiring circuits in the vehicle are protected from short circuits by a combination
of fuses and circuit breakers. This greatly reduces the chance of damage caused
by electrical problems.
To check a fuse, look at the silver-colored band inside the fuse.
If the band is broken or melted, repla ...
Airbag Readiness Light
This light shows if there is an electrical problem with the airbag system. The
system check includes the airbag sensor(s), passenger sensing system, the pretensioners,
the airbag modules, the wiring, and the crash sensing and diagnostic module.
The airbag readiness light comes on for several ...
