Chevrolet Cruze Repair Manual: How To Indentify Plastic Parts
Plastic parts can be identified by the SAE code, which is usually found on the rear of the part, and/or by the characteristics of the plastic.
Knowing the type of plastic aids in selecting the proper repair materials and in selecting the proper repair procedure.
Look for the SAE code stamped into the part.
Code Found
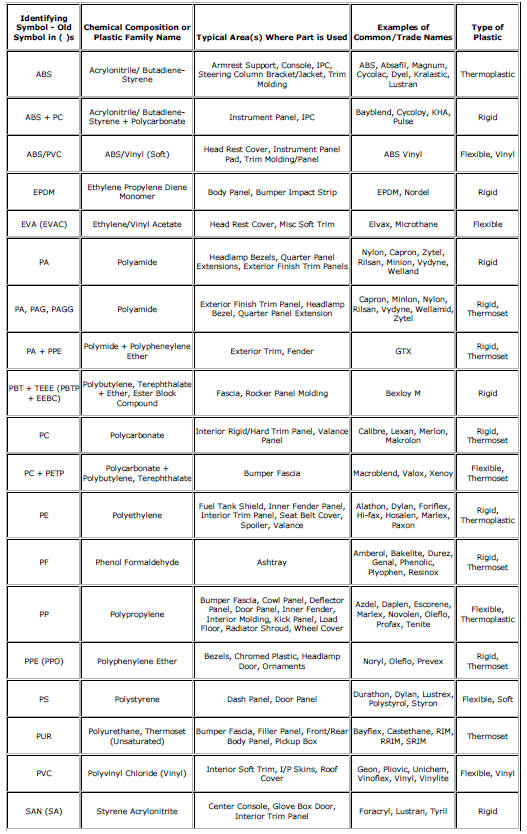
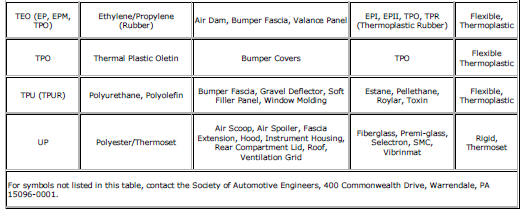
Match the code to those in the plastic identification chart to determine whether the plastic is thermoplastic or thermoset plastic, and whether the plastic is rigid or flexible. Refer to Plastic Identification and Refinishing Systems
No Code Found
Warning: Do NOT use a plastic burn test to distinguish the type of plastic. The burn test produces vapors which are harmful.
Perform one or both of the following tests to determine if the part is thermoplastic polyolefin or thermoset non-polyolefin.
Float Test
- Cut a shaving of plastic from the back of the part.
The shaving should be free of mold release agents and paint.
- Place the shaving in a container of water.
- Thermoplastic polyolefin floats.
- Thermoset non-polyolefin sinks.
Abrasion Test
- Sand a spot near the damaged area with Grade 36 Roloc Disc.
- Thermoplastic polyolefin material melts or frays when sanded.
- Thermoset non-polyolefin material sands cleanly.
Thermoplastic and thermoset plastics can be either rigid or flexible. Thermoplastic plastic parts are best repaired with a hot iron plastic material-feed welder, but are usually replaced. Thermoset plastic can be repaired with epoxy or other more rigid 2 package repair material.
For general repair instructions, refer to General Plastic Repair.
Plastic Identification and Refinishing Systems
 General Plastic Repair
Warning: In order to reduce the risk of personal injury when exposed
to toxic fumes while grinding, cutting, or applying repair material on
any type of sheet molded compound or RIM rigid plastic, o ...
 Body systems
...
Other materials:
Wheel Stud Replacement
Special Tools
CH-43631 Ball Joint Remover
For equivalent regional tools, refer to Special Tools.
Removal Procedure
Raise and suitably support the vehicle. Refer to Lifting and
Jacking the Vehicle.
Remove the tire and wheel assembly. Refer to Tire and Wheel Removal and
Installati ...
Ignition Positions (Key Access)
The ignition switch has four different positions.
Notice: Using a tool to force the key to turn in the ignition could
cause damage to the switch or break the key. Use the correct key, make sure it is
all the way in, and turn it only with your hand.
If the key cannot be turned by hand, see yo ...
Installation Procedure
Cut the rocker outer panel in corresponding locations to fit the
remaining original panel. The sectioning joint should be trimmed to
allow a gap of one-and-one-half-times the metal thickness at the sectioning
joint.
Create a 50 mm (2 in) backing plate from the unused portion of the ...
