Chevrolet Cruze Repair Manual: Rear Compartment Lid Emblem/Nameplate Replacement (VCDi AT)
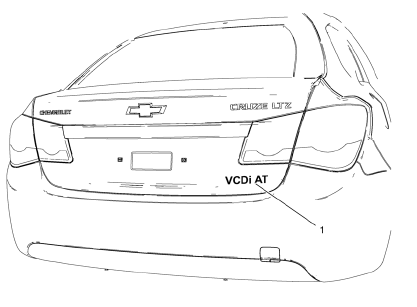
Rear Compartment Lid Emblem Assembly
Caution: Refer to Exterior Trim Emblem Removal Caution in the Preface section.
Procedure
- The part and surface should be 21°C (70°F) prior to installation. The vehicle should remain 21°C (70°F) for one hour after assembly to allow adhesive to develop sufficient bond strength.
- Use a Heat Gun or equivalent to remove the old emblem. Clean all adhesive from the rear compartment panel and wipe the surface dry with a clean lint-free towel prior to installing the new emblem.
- When removing protective liners from the adhesive tape, be careful not to touch tape with hands and do not allow tape to come in contact with dirt or any foreign matter prior to adhesion.
- Close the rear compartment lid prior to adhesion.
- Using the palm of the hand, wet out the emblem to the rear compartment lid to ensure full adhesion of the emblem is made.
Rear Compartment Lid Emblem/Nameplate Replacement (Diesel)
Rear Compartment Lid Emblem Assembly
Caution: Refer to Exterior Trim Emblem Removal Caution in the Preface section.
Procedure
- The part and surface should be 21°C (70°F) prior to installation. The vehicle should remain 21°C (70°F) for one hour after assembly to allow adhesive to develop sufficient bond strength
- Use a Heat Gun or equivalent to remove the old nameplate. Clean all adhesive from the rear compartment panel and wipe the surface dry with a clean lint-free towel prior to installing the new nameplate.
- When removing protective liners from the adhesive tape, be careful not to touch tape with hands and do not allow tape to come in contact with dirt or any foreign matter prior to adhesion.
- Close the rear compartment lid prior to adhesion
- Using the palm of the hand, wet out the emblem to the rear compartment lid to ensure full adhesion of the emblem is made.
Radiator Upper Grille Replacement
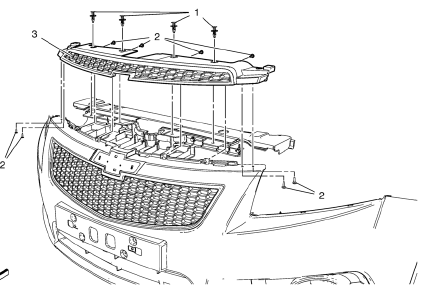
Preliminary Procedure
Remove the front bumper fascia. Refer to Front Bumper Fascia Replacement.
- Radiator Upper Grille Clip (Qty: 4)
- Radiator Upper Grille Screw (Qty: 8)
Caution: Refer to Fastener Caution in the Preface section.
Tighten 2.5 N·m(22 lb in)
- Radiator Upper Grille Assembly
Radiator Lower Grille Replacement
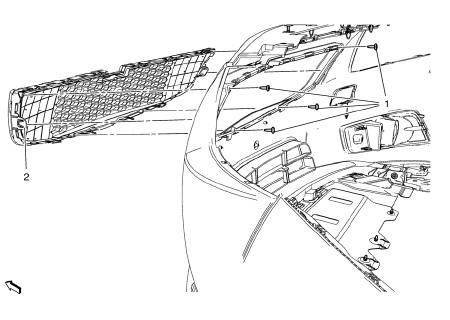
Preliminary Procedure
Remove the front bumper fascia. Refer to Front Bumper Fascia Replacement.
- Radiator Lower Grille Screw (Qty: 4)
Caution: Refer to Fastener Caution in the Preface section.
Tighten 2.5 N·m(22 lb in)
- Radiator Lower Grille Assembly
 Rear Compartment Lid Emblem/Nameplate Replacement (VCDi)
Rear Compartment Lid Emblem Assembly
Caution: Refer to Exterior Trim Emblem Removal Caution in the
Preface section.
Procedure
The part and surface should be 21°C (70°F) prior to installati ...
 Water Management Description and Operation
Plenum Water Flow Direction and Cleaning
A large percentage of water will flow off the windshield area into the plenum
chamber drain system and then down the outside on the
plenum to the underside ...
Other materials:
Antilock Brake System (ABS) Warning Light
The Antilock Brake System (ABS) light comes on briefly when the engine is started.
If the light does not come on, have it fixed so it will be ready to warn if there
is a problem.
If the ABS light comes on and stays on while driving, stop as soon as possible
and turn the ignition off.
Start ...
Wheel Stud Replacement
Removal Procedure
Raise and suitably support the vehicle. Refer to Lifting and
Jacking the Vehicle.
Remove the tire and wheel assembly. Refer to Tire and Wheel Removal and
Installation.
Remove the wheel bearing/hub. Refer to Rear Wheel Bearing and Hub
Replacement.
Cauti ...
Mirrors
Specifications
Inside Rearview Mirror Schematics
Outside Rearview Mirror Schematics
Outside Rearview Mirror Replacement
Preliminary Procedure
Remove the front side door trim. Refer to Front Side
Door Trim Replacement.
Remove the front side door upper trim cove ...
