
Chevrolet Cruze Repair Manual: Rear Side Door Check Replacement
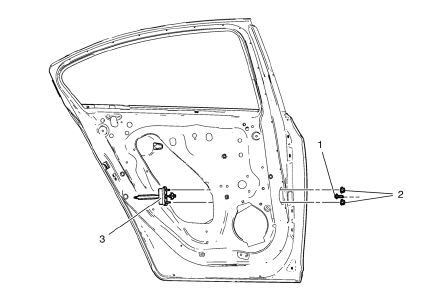
Preliminary Procedure
- Remove rear side door trim panel. Refer to Rear Side Door Trim Replacement
- Remove the rear side door water deflector. Refer to Rear Side Door Water Deflector Replacement
- Rear Side Door Check Bolt
Caution: Refer to Fastener Caution in the Preface section.
Tip Place the door in the full open position.
Tighten 25 N·m (18 lb ft)
- Rear Side Door Check Nut
Procedure
Remove the water deflector.
Tighten 9 N·m (79 lb in)
- Rear Side Door Check
 Hood Primary Latch Release Cable Replacement
Preliminary Procedure
Remove hood primary latch release cable handle. Refer to Hood Primary
Latch Release Cable Handle Replacement.
Remove the front bumper fascia. Refer to Front Bu ...
 Front Side Door Adjustment
Preliminary Procedure
Remove the front wheelhouse liner. Refer to Front Wheelhouse Liner
Replacement.
Front Side Door
Caution: Refer to Fastener Caution in the Preface section.
Procedure
...
Other materials:
Rear Compartment Lid Emblem/Nameplate Replacement (CDX)
Rear Compartment Lid Emblem Assembly
Caution: Refer to Exterior Trim Emblem Removal Caution in the Preface
section.
Procedure
The part and surface should be 21°C (70°F) prior to installation. The
vehicle should remain 21°C (70°F) for
one hour after assembly to allow adhesive to deve ...
General Information
Your vehicle is an important investment. This section describes the required
maintenance for the vehicle. Follow this schedule to help protect against major
repair expenses resulting from neglect or inadequate maintenance. It may also help
to maintain the value of the vehicle if it is sold. It ...
Taillamps, Turn Signal, Sidemarker, Stoplamps, and Back-Up Lamps
Trunk Deck Inboard Taillamps
1. Open the trunk.
2. Remove the trunk deck trim cover (1).
3. Remove the bulb socket (2) by turning counterclockwise and pulling straight out.
4. Remove the bulb from the socket.
5. Install the new bulb in the bulb socket.
6. Install the bulb socket by turni ...
