Chevrolet Cruze Repair Manual: Removal Procedure
Warning: Refer to Approved Equipment for Collision Repair Warning in the Preface section.
Warning: Refer to Glass and Sheet Metal Handling Warning in the Preface section.
- Disable the SIR System. Refer to SIR Disabling and Enabling.
- Disconnect the negative battery cable. Refer to Battery Negative Cable Disconnection and Connection.
- Remove all related panels and components.
- Visually inspect the damage. Repair as much of the damage as possible.
- Remove the sealers and anti-corrosion materials from the repair area, as necessary. Refer to Anti-Corrosion Treatment and Repair.
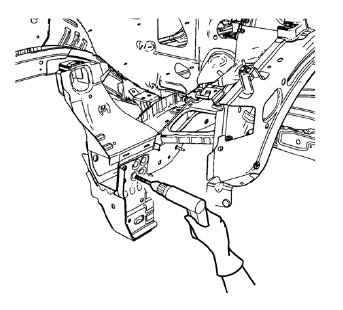
- Locate and mark all the necessary factory welds and weld seams of the drivetrain and front suspension frame front support.
- Drill out front flange of front suspension support frame from above through the front compartment side rail.
Note: Drill holes are necessary for later plug welds.
- Drill all factory welds. Note the number and location of welds for installation of the service assembly.
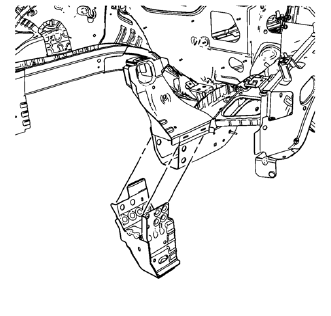
- Remove the drivetrain and front suspension frame front support.
 Drivetrain and Front Suspension Frame Front Support Replacement (MAG-Welding)
Note: According to different corrosion warranties, only the
regional mandatory joining methods are allowed. ...
 Installation Procedure
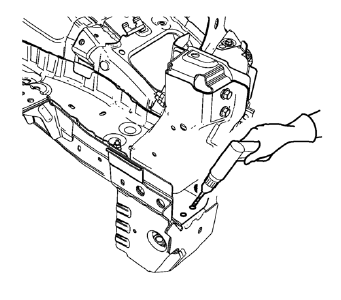
Drill 8 mm (5/16 in) for plug welding along the edges of the drivetrain
and front suspension frame front support as noted from the
original panel.
Clean and prepare the attaching &n ...
Other materials:
Inflatable Restraint Roof Rail Modules
The roof rail modules are located under the headliner extending from the
front windshield pillar to the rear window pillar. The roof rail
modules contain a housing, inflatable air bag, initiating device, and a canister
of gas generating material. The initiator is part of the roof
rail module d ...
Rear Compartment Lid Weatherstrip Replacement
Rear Compartment Lid Weatherstrip
Procedure
Start at the upper corner of the rear compartment opening and pull the
weatherstrip away from the rear
compartment opening flange.
Position the weatherstrip in the upper corner of the r 2. ear
compartment opening.
Working downward alon ...
Front Floor Console Replacement
Preliminary Procedure
Remove the instrument panel lower trim panel - left side. Refer to
Instrument Panel Lower Trim Panel Replacement - Left
Side
Remove the instrument panel lower trim panel - right side. Refer to
Instrument Panel Lower Trim Panel Replacement - Right
Side
Remo ...
