Chevrolet Cruze Repair Manual: Removal Procedure
Warning: Refer to Approved Equipment for Collision Repair Warning in the Preface section.
Warning: Refer to Glass and Sheet Metal Handling Warning in the Preface section.
- Disable the SIR System. Refer to SIR Disabling and Enabling.
- Disconnect the negative battery cable. Refer to Battery Negative Cable Disconnection and Connection.
- Remove all related panels and components.
- Visually inspect the damage. Repair as much of the damage as possible.
- Remove the sealers and anti-corrosion materials from the repair area, as necessary. Refer to Anti-Corrosion Treatment and Repair.
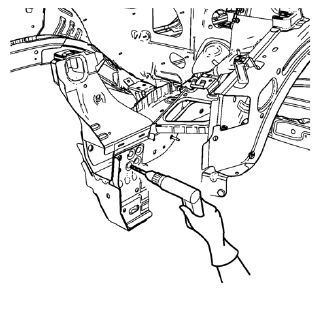
- Locate and mark all the necessary factory welds and weld seams of the drivetrain and front suspension frame front support.
- Drill out front flange of front suspension support frame from above through the front compartment side rail.
Note: Create slots for MIG-Brazing out of drill holes.
- Drill all factory welds. Note the number and location of welds for installation of the service assembly.

- Remove the drivetrain and front suspension frame front support.
 Drivetrain and Front Suspension Frame Front Support Replacement (MIG-Brazing)
Note: According to different corrosion warranties, only the
regional mandatory joining methods are allowed. ...
 Installation Procedure
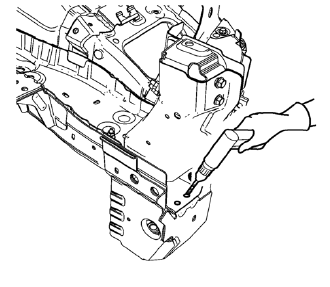
Create 8 x 14 mm (5/16 x 15/16 in) slots for MIG-Brazing along the edges
of the drivetrain and front suspension frame front support
as noted from the original panel.
Clean and prepare th ...
Other materials:
Windshield Washer Pump Seal Replacement
Removal Procedure
Open the hood.
Remove the windshield washer pump. Refer to Windshield Washer Pump
Replacement
Using a small flat-bladed tool, remove the washer pump terminal seal (1)
from the washer solvent container (2).
Installation Procedure
Position the washer pump ...
Automatic Dimming Rearview Mirror
To adjust the inside rearview mirror, hold the rearview mirror in the center
and move it to view the area behind the vehicle.
For vehicles with an automatic dimming rearview mirror, the mirror will automatically
reduce the glare from the headlamps from behind.
The dimming feature and the indic ...
Steering Angle Sensor Calibration Warning
Warning: For vehicles with electric power steering (EPS) and without
a vehicle stability enhancement program, the steering angle sensor
MUST always be calibrated after the battery has been disconnected. Failure to
calibrate the steering angle sensor could limit the operation
of the EPS system ...
