Chevrolet Cruze Owners Manual: Securing Child Restraints (Rear Seat)
When securing a child restraint in a rear seating position, study the instructions that came with the child restraint to make sure it is compatible with this vehicle.
If the child restraint has the LATCH system.
Do not secure a child seat in a position without a top tether anchor if a national or local law requires that the top tether be anchored, or if the instructions that come with the child restraint say that the top strap must be anchored.
In Canada, the law requires that forward-facing child restraints have a top tether, and that the tether be attached.
If the child restraint does not have the LATCH system, you will be using the safety belt to secure the child restraint in this position. Be sure to follow the instructions that came with the child restraint. Secure the child in the child restraint when and as the instructions say.
If more than one child restraint needs to be installed in the rear seat.
1. Put the child restraint on the seat.
If the head restraint interferes with the proper installation of the child restraint, the head restraint may be removed.
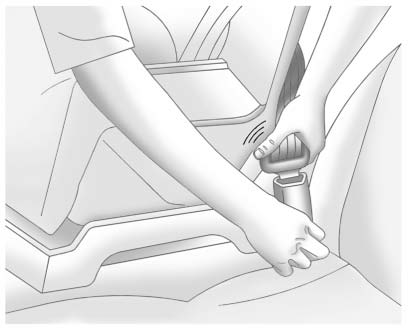
2. Pick up the latch plate, and run the lap and shoulder portions of the vehicle's safety belt through or around the restraint. The child restraint instructions will show you how.

3. Push the latch plate into the buckle until it clicks. If the latch plate will not go fully into the buckle, check if the correct buckle is being used.
Position the release button on the buckle so that the safety belt could be quickly unbuckled if necessary.

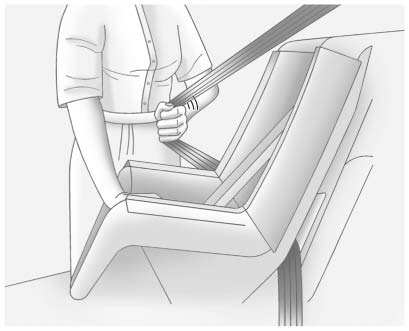
4. Pull the shoulder belt all the way out of the retractor to set the lock. When the retractor lock is set, the belt can be tightened but not pulled out of the retractor.

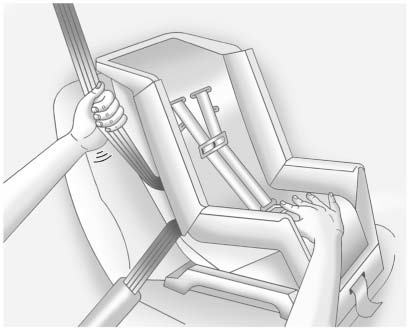
5. To tighten the belt, push down on the child restraint, pull the shoulder portion of the belt to tighten the lap portion of the belt, and feed the shoulder belt back into the retractor. When installing a forward-facing child restraint, it may be helpful to use your knee to push down on the child restraint as you tighten the belt.
Try to pull the belt out of the retractor to make sure the retractor is locked. If the retractor is not locked, repeat Steps 4 and 5.
6. If the child restraint has a top tether, follow the child restraint manufacturer's instructions regarding the use of the top tether.
7. Before placing a child in the child restraint, make sure it is securely held in place. To check, grasp the child restraint at the safety belt path and attempt to move it side to side and back and forth. When the child restraint is properly installed, there should be no more than 2.5 cm (1 in) of movement.
To remove the child restraint, unbuckle the vehicle safety belt and let it return to the stowed position.
If the top tether is attached to a top tether anchor, disconnect it. If the head restraint was removed, reinstall it before the seating position is used.
 Securing Child Restraints (Front Passenger Seat)
This vehicle has airbags. A rear seat is a safer place to secure a forward-facing
child restraint.
In addition, the vehicle has a passenger sensing system which is designed to
turn off the right ...
 Storage
...
Other materials:
Installation Procedure
Remove rear end upper panel extension (1) from service part.
Cut the body side inner panel in corresponding locations to fit the
remaining original panel. The sectioning joint should be trimmed to
allow a gap of one-and-one-half-times the metal thickness at the sectioning
jo ...
Removal Procedure
Warning: Refer to Approved Equipment for Collision Repair Warning in the
Preface section.
Warning: Refer to Collision Sectioning Warning in the Preface section.
Warning: Refer to Glass and Sheet Metal Handling Warning in the Preface section.
Disable the SIR System. Refer to SIR Dis ...
Removal Procedure
Support the radiator and condenser from above using the
condenser tabs on each side.
Remove the lower steering intermediate shaft bolt (1).
Raise the vehicle on a hoist. Refer to Lifting and Jacking the Vehicle.
Remove the tire and wheel assemblies. Refer to Tire and Wheel Remov ...
