Chevrolet Cruze Repair Manual: Removal Procedure
Warning: Refer to Glass and Sheet Metal Handling Warning in the Preface section.
- Disable the SIR System. Refer to SIR Disabling and Enabling.
- Disconnect the negative battery cable. Refer to Battery Negative Cable Disconnection and Connection.
- Remove the front side door. Refer to Front Side Door Replacement.
- Remove the front side door outside handle. Refer to Front Side Door Outside Handle Replacement.
- Remove the outside rearview mirror. Refer to Outside Rearview Mirror Replacement.
- Remove the sealers and anti-corrosion materials from the repair area, as necessary. Refer to Anti-Corrosion Treatment and Repair.
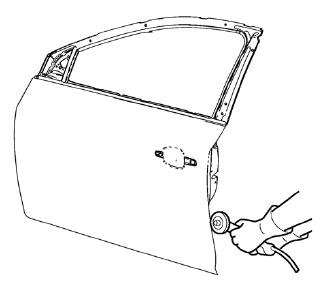
- Grind the edges of the front side door outer panel to separate the outer door panel from the door shell.
- Remove the front side door outer door panel.
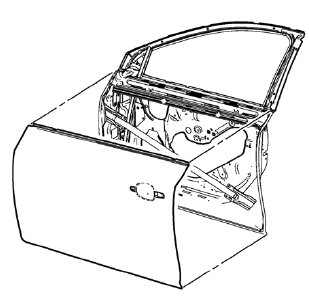
- Remove the sealers and anti-corrosion materials from the repair area, as necessary. Refer to Anti-Corrosion Treatment and Repair
- Straighten the edges of the door shell.
 Front Side Door Outer Panel Replacement (MIG-Brazing)
Special Tools
BO-6396 Bonding Pliers
BO-6392 Flanging Tool Kit
For equivalent regional tools, refer to Special Tools.
Note: According to different corrosion warranties, only the
regional m ...
 Installation Procedure
Apply structural adhesive on the flanges of the front side door inner
panel where the front side door outer panel bears on.
Align the front side door outer panel.
Verify the fit of the front ...
Other materials:
AM-FM Radio
Control Buttons
The buttons used to control the radio are: BAND: Press to turn the radio
on and choose between AM, FM, and SiriusXM®, if equipped.
MENU/SEL: Turn to navigate the available menus and to search for stations.
INFO: Press to display additional information that may be available for
...
Brake System Warning Light
The vehicle brake system consists of two hydraulic circuits. If one circuit is
not working, the remaining circuit can still work to stop the vehicle. For normal
braking performance, both circuits need to be working.
If the warning light comes on, there is a brake problem. Have the brake system ...
Thread Repair
General purpose thread repair kits are available commercially.
Warning: Refer to Safety Glasses Warning in the Preface section.
Note: Refer to the thread repair kit manufacturer's instructions
regarding the size of the drill and which tap to use.
Always avoid any buildup of chips. Back ou ...
