Chevrolet Cruze Repair Manual: Steering Knuckle Replacement
Preliminary Procedure
- Raise and support the vehicle. Refer to Lifting and Jacking the Vehicle
- Remove the wheel bearing and hub assembly. Refer to Front Wheel Bearing and Hub Replacement.
- Separate the outer tie rod end from the knuckle. Refer to Steering Linkage Outer Tie Rod Replacement.
- Remove the wheel bearing/hub. Refer to Lower Control Arm Replacement.
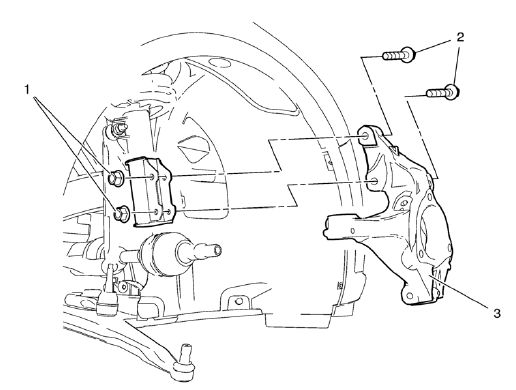
Steering Knuckle Bolt (Qty: 2)
Steering Knuckle Nut (Qty: 2)
Caution: Refer to Fastener Caution in the Preface section.
Tighten 90 N·m(66 lb ft) + 60-70 degrees
Steering Knuckle
 Installation Procedure
Position the front brake shield (2) and front wheel bearing/hub (1)
assembly in the steering knuckle.
Caution: Refer to Fastener Caution in the Preface section.
Install the NEW fr ...
 Lower Control Arm Replacement
Special Tools
EN-45059 Torque Angle Sensor Kit
For equivalent regional tools, refer to Special Tools. ...
Other materials:
Backup Lamp Replacement
Preliminary Procedures
Remove the rear compartment sill trim plate. Refer to Rear Compartment
Sill Trim Plate Replacement.
Disconnect the electrical harness connector from the backup lamp socket.
Back Up Lamp Nut (Qty: 4)
Caution: Refer to Fastener Caution in the Preface ...
If a Tire Goes Flat
It is unusual for a tire to blowout while driving, especially if the tires are
maintained properly. If air goes out of a tire, it is much more likely to leak out
slowly. But if there ever is a blowout, here are a few tips about what to expect
and what to do: If a front tire fails, the flat tir ...
Installation Procedure
Install the following components on the drivetrain and front suspension
frame if removed:
The radiator support brackets.
The stabilizer shaft--Refer to Stabilizer Shaft Replacement.
The lower control arms--Refer to Lower Control Arm Replacement.
The steering gear--Refer to Steering ...
