Chevrolet Cruze Repair Manual: Installation Procedure
- Align the front side door outer panel.
- Verify the fit of the front side door outer panel.
- Clamp the front side door outer panel into position.
- Pre-flanging the flange with BO-6396 pliers and BO-6392 tool kit .
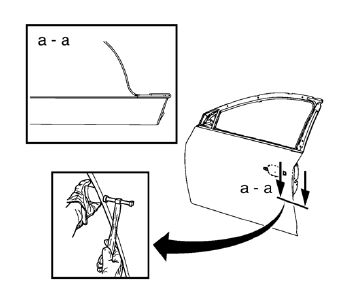
- Continue to hammer in stages along the hem flanges.
- Apply the sealers and anti-corrosion materials to the repair area, as necessary. Refer to Anti-Corrosion Treatment and Repair.
- Install the outside rearview mirror. Refer to Outside Rearview Mirror Replacement.
- Install the front side door outside handle. Refer to Front Side Door Outside Handle Replacement
- Install the front side door. Refer to Front Side Door Replacement
- Paint the repaired area. Refer to Basecoat/Clearcoat Paint Systems.
- Install all related panels and components.
- Connect the negative battery cable. Refer to Battery Negative Cable Disconnection and Connection.
- Enable the SIR system. Refer to SIR Disabling and Enabling.
 Removal Procedure
Warning: Refer to Glass and Sheet Metal Handling Warning in the Preface
section.
Disable the SIR System. Refer to SIR Disabling
and Enabling.
Disconnect the negative battery cable. Refer to ...
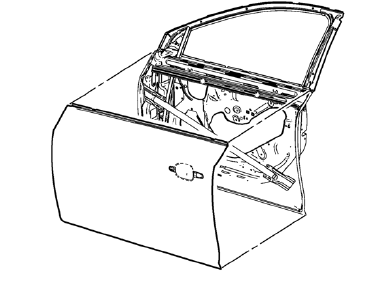
 Front Side Door Outer Panel Replacement (MIG-Brazing)
Special Tools
BO-6396 Bonding Pliers
BO-6392 Flanging Tool Kit
For equivalent regional tools, refer to Special Tools.
Note: According to different corrosion warranties, only the
regional m ...
Other materials:
Installation Procedure
Cut the roof front header panel in corresponding locations to fit the
remaining original panel. The sectioning joint should be trimmed
to allow a gap of one-and-one-half-times the metal thickness at the
sectioning joint.
Create a 50 mm (2 in) backing plate from the unused portion of ...
Instrument Panel Outer Air Outlet Duct Replacement
Preliminary Procedure
Remove instrument panel assembly. Refer to Instrument Panel Assembly
Replacement.
Instrument Panel Outer Air Outlet Duct Screw (Qty: 7)
Caution: Refer to Fastener Caution in the Preface section.
Tighten
2.5 N·m (22 lb in)
Instrument Panel Outer Air Outlet Duct
Floo ...
Exit Lighting
The headlamps, taillamps, parking lamps, back-up lamps, and license plate lamps
come on at night, or in areas with limited lighting, when the key is removed from
the ignition.
The dome lamps also come on when the key is removed from the ignition. The exterior
lights and dome lamps remain on a ...
