Chevrolet Cruze Repair Manual: Installation Procedure
- Remove all mounds or loose pieces of urethane adhesive from the pinch-weld area.
- Inspect for any of the following problems in order to help prevent future breakage of the window:
- High weld
- Solder spots
- Hardened sealer
- Any other obstruction or irregularity in the pinch-weld flange
- After repairing the opening as indicated, perform the following steps:
Remove all traces of broken glass from the outer cowl panel, seats, floor, and defroster ducts.
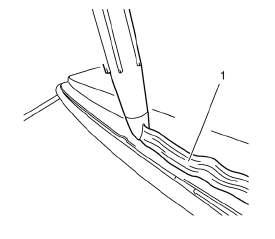
- Apply adhesive bead (1).
Cut into the tip of the cartridge in such a way that a bead of adhesive approx. 13 mm (0.511 in) thick is produced.
- Insert windshield.
- Place the windshield on the roof frames and lower down.
- Insert windshield with BO-641 holder .
- Secure windshield in position with fabric tape.
- Second mechanic required.
- Clean any excess urethane adhesive from the body.
- Use a soft spray of warm water in order to immediately water test the window.
- Inspect the window for leaks.
- If any leaks are found, use a plastic paddle in order to apply extra urethane adhesive at the leak point.
- Retest the window for leaks.
- Maintain the following conditions in order to properly cure the urethane adhesive:
- Partially lower a door window in order to prevent pressure buildups when closing doors before the urethane adhesive cures.
- Do not drive the vehicle until the urethane adhesive is cured. Refer to the above curing times.
- Do not use compressed air in order to dry the urethane adhesive.
- Install the roof rail front right and left.
- Install inside rearview mirror. Refer to Inside Rearview Mirror Replacement.
- Install windshield garnish molding. Refer to Windshield Garnish Molding Replacement.
- Install air inlet grille panel. Refer to Air Inlet Grille Panel Replacement.
- Connect battery.
 Removal Procedure
Warning: Refer to Cracked Window Warning in the Preface section.
Warning: Refer to Glass and Sheet Metal Handling Warning in the Preface section
Note: Position the vehicle on level ground and move ...
 Front Side Door Window Adjustment
Warning: Refer to Glass and Sheet Metal Handling Warning in the Preface
section.
Warning: Refer to Express Window Down Warning in the Preface section.
Preliminary Procedure
Remove the fr ...
Other materials:
Seat Adjustment
Manual Front Seats
To adjust a manual seat:
1. Pull the handle at the front of the seat.
2. Slide the seat to the desired position and release the handle.
3. Try to move the seat back and forth to be sure it is locked in place.
Seat Height Adjuster
If available, move the lever up or down t ...
Installation Procedure
Remove the front wheelhouse rear panel brace (1) from service panel.
Create 6 x 20 mm (4/16 x 12/16 in) slots for MIG-brazing along the edges
of the front wheelhouse (1).
Clean and prepare the attaching surfaces for brazing.
Note: In MIG-brazing areas 50 mm (2 in) must b ...
Installation Procedure
Drill 8 mm (5/16 in) for plug welding along the edges of the service
panel as noted from the original
panel.
Clean and prepare the attaching surfaces for welding.
Position the body lock pillar inner panel on the vehicle.
Verify the fit of the panel.
Clamp th ...
