Chevrolet Cruze Repair Manual: Strut Assembly Replacement
Special Tools
CH 49375 Wrench
For equivalent regional tools, refer to Special Tools.
Removal Procedure
- Raise and the vehicle. Refer to Lifting and Jacking the Vehicle.
- Remove the tire and wheel assembly. Refer to Tire and Wheel Removal and Installation.
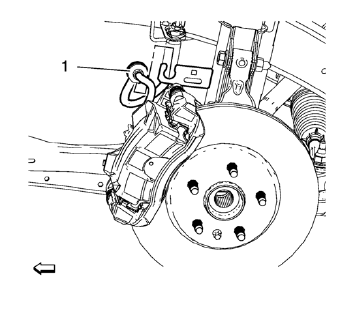
- Separate the brake hose (1) from the shock absorber.
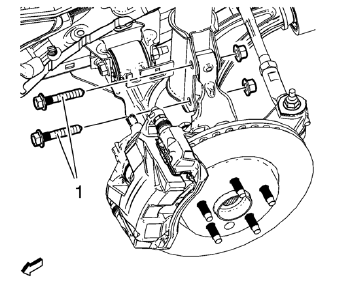
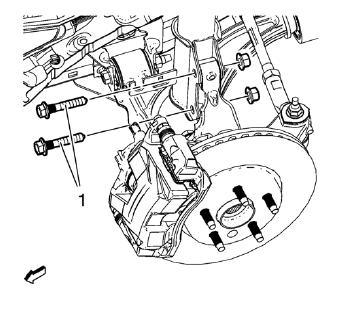
- Remove the steering knuckle nuts and bolts (1).
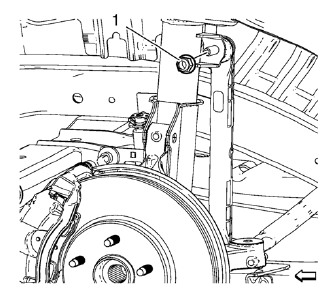
- Remove the stabilizer shaft link nut (1) from the front strut.
- Lower the vehicle.
- Open the hood.
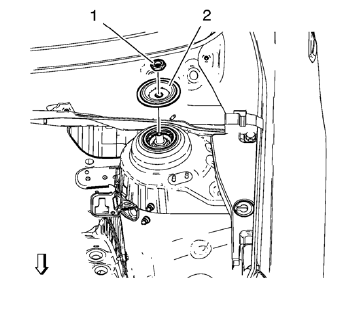
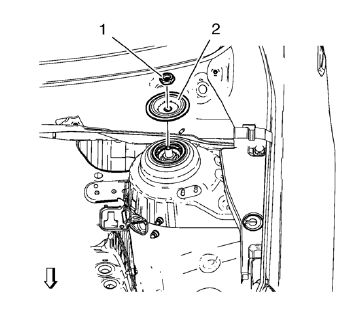
- Remove the upper strut mount nut (1), use the CH 49375 wrench .
- Remove the strut mounting plate (2).
- Separate the front strut from the knuckle.
- Remove the front strut assembly from the vehicle.
- For servicing the individual strut components, refer to Strut, Strut Component, or Spring Replacement.
Installation Procedure
- Install the front strut assembly.
Caution: Refer to Fastener Caution in the Preface section.
- Install the strut mounting plate (2).
- Install the upper strut mount nut (1), using the CH 49375 wrench and tighten to 45 N·m (34 lb ft).
- Insert the front strut in the knuckle.
- Install the steering knuckle nuts and bolts (1) and tighten to 90 N·m (66 lb ft) +60-70 degrees.
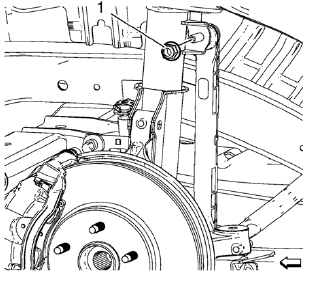
Install the stabilizer shaft link nut (1) and tighten to 65 N·m (48 lb ft).
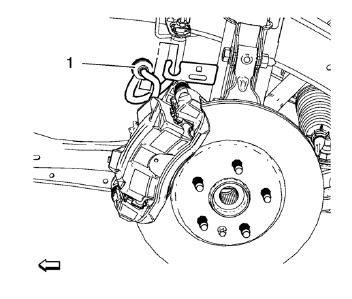
- Install the brake hose (1) to the strut.
- Install the front tire and wheel assembly. Refer to Tire and Wheel Removal and Installation.
- Lower the vehicle.
- Check the front end alignment specifications. Refer to Wheel Alignment Specifications.
 Wheel Stud Replacement
Special Tools
CH-43631 Ball Joint Remover
For equivalent regional tools, refer to Special Tools.
Removal Procedure
Raise and suitably support the vehicle. Refer to Lifting and
Jacking ...
 Shock Absorber Disposal
Warning: Use the proper eye protection when drilling to prevent
metal chips from causing physical injury.
Clamp the strut in a vise horizontally with the rod ( 1) completely
extended.
D ...
Other materials:
Roof
Specifications
Sunroof Schematics
Sunroof Component Views
Sunroof Frame
Sunroof Sunshade
Sunroof Window
Sunroof Window Seal
Sunroof Housing Rear Drain Hose
Sunroof Housing Drain Gutter
Sunroof Frame Bolts
Sunroof Window Guide
Sunroof Air Deflector Cover
Su ...
Information Displays
Driver Information Center (DIC)
The DIC displays information about your vehicle. It also displays warning messages
if a system problem is detected.
DIC Operation and Displays
The DIC has different displays which can be accessed by using the DIC buttons
on the turn signal lever.
The DIC displ ...
Installation Procedure
Remove the front wheelhouse rear panel brace (1) from service panel.
Create 6 x 20 mm (4/16 x 12/16 in) slots for MIG-brazing along the edges
of the front wheelhouse (1).
Clean and prepare the attaching surfaces for brazing.
Note: In MIG-brazing areas 50 mm (2 in) must b ...
