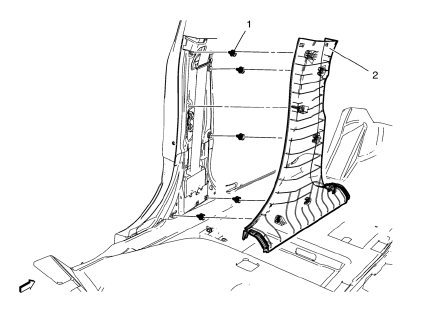
Chevrolet Cruze Repair Manual: Center Pillar Upper Garnish Molding Replacement

Preliminary Procedure
- Remove the center pillar lower garnish molding. Refer to Center Pillar Lower Ga rnish Molding Replacement
- Remove the seat belt from the front seat. Refer to Driver or Passenger Seat Retractor Side Belt Replacement
- Center Pillar Upper Garnish Molding Clip
- Center Pillar Lower Garnish Molding Assembly
Procedure
When replacing the center pillar lower garnish molding, remove the seat belt through the molding.
Center Pillar Lower Garnish Molding Replacement
Preliminary Procedure
- Remove the front side door sill trim plate. Refer to Front Side Door Sill Trim Plate Replacement
- Remove the rear side door sill trim plate. Refer to Rear Side Door Sill Trim Plate Replacement.
- Center Pillar Lower Garnish Molding Clip (Qty: 6)
- Center Pillar Lower Garnish Molding Assembly
Quarter Window Garnish Molding Replacement
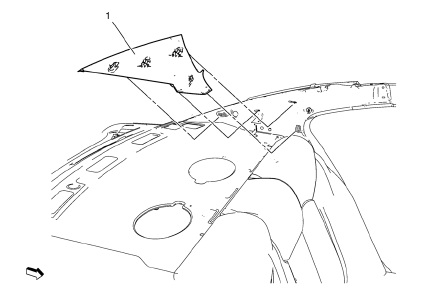
- Quarter Window Garnish Molding Assembly.
 Windshield Garnish Molding Replacement
Preliminary Procedure
Disable the SIR system. Refer to SIR Disabling and Enabling.
Windshield Garnish Molding Assembly
Procedure
Loosen tether clip and steel clips.
Disconnect ...
 Body Side Trim Panel Replacement - Left Side
Preliminary Procedure
Remove the rear side door sill trim plate. Refer to Rear Side Door Sill
Trim Plate Replacement.
Remove the rear seat back. Refer to Rear Seat Replacement.
Re ...
Other materials:
Installation Procedure
Clean and prepare the attaching surfaces for brazing.
Apply structural adhesive to the attaching surfaces.
Position the rear bumper impact bar stud plate on the vehicle.
Verify the fit of the rear bumper impact bar stud plate
Clamp the rear bumper impact bar stud plate into ...
Air/Wind Noise
Special Tools
CH-39570 Chassis Ear
GE-41416 Ultrasonic Leak Detector
Warning: Refer to Assistant Driving Warning in the Preface section.
To analyze a reported windnoise condition, test drive the vehicle to
determine the origin of the noise.
Choose a regular route with smooth and strai ...
Tire Pressure
Tires need the correct amount of air pressure to operate effectively.
Notice: Neither tire underinflation nor overinflation is good.
Underinflated tires, or tires that do not have enough air, can result in:
• Tire overloading and overheating which could lead to a blowout.
• Premature or irregula ...
