Chevrolet Cruze Repair Manual: Installation Procedure
- Clean and prepare the attaching surfaces for brazing.
- Apply structural adhesive to the attaching surfaces.
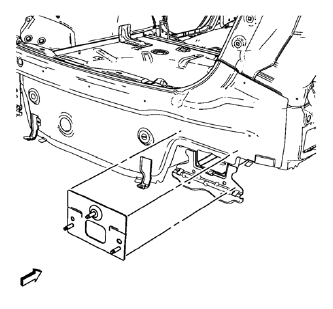
- Position the rear bumper impact bar stud plate on the vehicle.
- Verify the fit of the rear bumper impact bar stud plate
- Clamp the rear bumper impact bar stud plate into position.
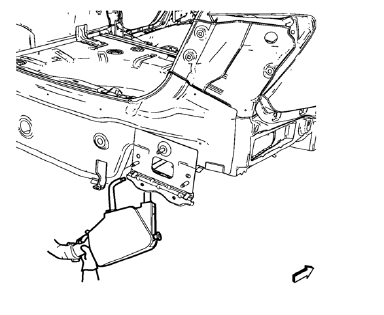
- Spot weld accordingly.
- Apply the sealers and anti-corrosion materials to the repair area, as necessary. Refer to Anti-Corrosion Treatment and Repair.
- Paint the repaired area. Refer to Basecoat/Clearcoat Paint Systems.
- Install all related panels and components.
- Connect the negative battery cable. Refer to Battery Negative Cable Disconnection and Connection.
- Enable the SIR system. Refer to SIR Disabling and Enabling.
 Removal Procedure
Warning: Refer to Approved Equipment for Collision Repair Warning in the
Preface section.
Warning: Refer to Glass and Sheet Metal Handling Warning in the Preface section.
Disable the SIR Syst ...
 Front Side Door Outer Panel Replacement (MAG-Welding)
Special Tools
BO-6396 Bonding Pliers
BO-6392 Flanging Tool Kit
For equivalent regional tools, refer to Special Tools
Note: According to different corrosion warranties, only the
regional ma ...
Other materials:
Tire Pressure
Tires need the correct amount of air pressure to operate effectively.
Notice: Neither tire underinflation nor overinflation is good.
Underinflated tires, or tires that do not have enough air, can result in:
• Tire overloading and overheating which could lead to a blowout.
• Premature or irregula ...
Engine Oil Pressure Light
Notice: Lack of proper engine oil maintenance can damage the engine.
Driving with the engine oil low can also damage the engine. The repairs would not
be covered by the vehicle warranty.
Check the oil level as soon as possible. Add oil if required, but if the oil
level is within the operating ...
Mitsubishi Outlander Plug-In Hybrid Award in 2024
The Mitsubishi Outlander Plug-in Hybrid is a remarkable blend of clean electric motoring and the convenience of gasoline refueling. Designed as a seven-passenger SUV, it caters to drivers who want to embrace eco-friendly options without fully committing to all-electric vehicles. Mark Chaffin, ...
