Chevrolet Cruze Repair Manual: Fog Lamp Aiming
Preparation Procedure
Important: Horizontal aim is not adjustable on this vehicle. Vertical aim is done by an adjusting nut located on the rear of the fog lamp.
Prior to aiming the fog lamps, perform the following steps:
- Completely assemble all of the components on the vehicle.
- Place the vehicle on a level surface.
- Stop all unnecessary operations or work that could affect the ride height of the vehicle.
- Close the doors and verify that the luggage compartment is empty.
- Stabilize the suspension by rocking the vehicle sideways.
- Ensure that the fuel level is full.
- Ensure that the tires are inflated to the proper pressure.
- Ensure that the driver or a similar weight , approximately 75 kg (165 lb), is in the vehicle driver seat.
Aiming Procedure
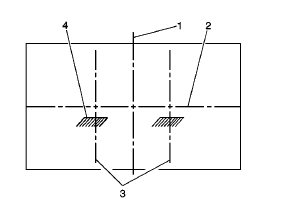
- Park the vehicle 7.6 m (25 ft) away from the target screen.
- Measure from the center of the fog lamp to the ground line. Using this measurement, mark the horizontal centerline (2) of the fog lamp on the target screen directly in front of the vehicle
- Turn ON the fog lamps. The top of the fog lamp beam image (4) on the target screen should be 102 mm (4 in) below the center of the fog lamp lens height.
- Adjust the fog lamp as required using the adjusting screw above the projector lens on the outside of the front bumper fascia.
- Turn OFF the fog lamps.
Front Side Turn Signal Lamp Replacement
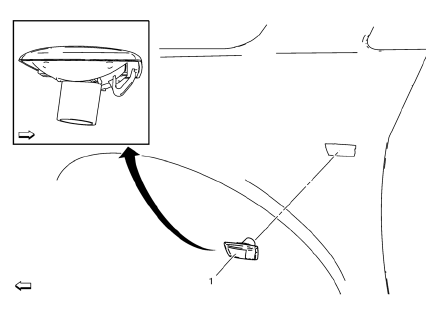
Preliminary Procedures
- Remove the front wheelhouse liner. Refer to Front Wheelhouse Liner Replacement.
- Disconnect the front turn signal lamp electrical connector from the forward lamp harness assembly at the topside of the fender panel.
- Rotate the lamp socket from the lamp housing.
- Squeeze the lamp housing locking tab and push outward in order to remove the lamp housing from the fender panel.
Front Turn Signal Lamp Assembly
Procedure
Replace the bulb, as needed.
Front Side Turn Signal Lamp Bulb Replacement
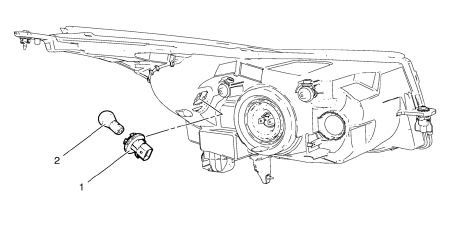
- Park/Turn Bulb Socket
Warning: Refer to Halogen Bulb Warning in the Preface section.
Tip
Rotate counterclockwise and remove the socket from the headlamp assembly.
- Park/Turn Bulb
Procedure
Remove the bulb from the bulb socket.
High Mount Stop Lamp Replacement

- High Mount Stop Lamp Screw (Qty: 2)
Procedure
Hand tighten only, no torque required.
- High Mount Stop Lamp Assembly
Procedure
Disconnect the electrical connector at the high mount stop lamp.
Tip
The lamp is Light Emitting Diode (LED) and is serviced as an assembly.
 Front Fog Lamp Bulb Replacement
Preliminary Procedures
Raise and support the vehicle. Refer to Lifting and Jacking the Vehicle
Disconnect the forward lamp electrical harness connector from the fog
lamp bulb socket ...
 Backup Lamp Replacement
Preliminary Procedures
Remove the rear compartment sill trim plate. Refer to Rear Compartment
Sill Trim Plate Replacement.
Disconnect the electrical harness connector from the backu ...
Other materials:
Driver or Passenger Seat Replacement
Removal Procedure
Warning: Refer to SIR Warning in the Preface section.
Warning: When carrying a live inflator module, make sure the bag
opening is pointed away from you. This minimizes the chance of
injury in the case of an accidental deployment. Never carry the inflator module
by the wi ...
Backup Lamp Replacement
Preliminary Procedures
Remove the rear compartment sill trim plate. Refer to Rear Compartment
Sill Trim Plate Replacement.
Disconnect the electrical harness connector from the backup lamp socket.
Back Up Lamp Nut (Qty: 4)
Caution: Refer to Fastener Caution in the Preface ...
Servicing the Airbag-Equipped Vehicle
Airbags affect how the vehicle should be serviced. There are parts of the airbag
system in several places around the vehicle. Your dealer and the service manual
have information about servicing the vehicle and the airbag system.
WARNING
For up to 10 seconds after the vehicle is turned off and ...
