Chevrolet Cruze Repair Manual: Front Bumper Impact Bar Replacement
Removal Procedure
Warning: Refer to Approved Equipment for Collision Repair Warning in the Preface section.
Warning: Refer to Glass and Sheet Metal Handling Warning in the Preface section.
- Disable the SIR System. Refer to SIR Disabling and Enabling.
- Disconnect the negative battery cable. Refer to Battery Negative Cable Disconnection and Connection.
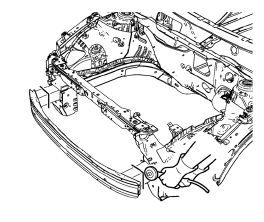
- Remove all related panels and components.
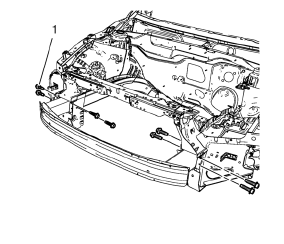
- Remove the 8 front bumper impact bar bolts (1).
- Cut the front bumper impact bar left and right.
- Locate and mark all factory welds.
- Drill all factory welds.
- Remove the remaining parts of 8. the front bumper impact bar.
Installation Procedure

- Position the front bumper impact bar on the vehicle.
Caution: Refer to Fastener Caution in the Preface section.
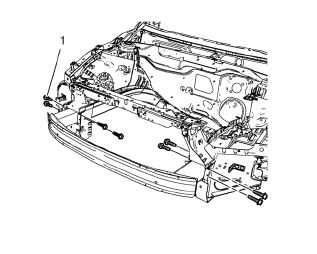
- Install the 8 front bumper impact bar bolts (1) and tighten to 110 N·m (81 lb ft).
Note: Use only the original front bumper impact bar bolts. Replace bolts if damaged.
- Paint the repaired area. Refer to Basecoat/Clearcoat Paint Systems.
- Install all related panels and components.
- Connect the negative battery cable. Refer to Battery Negative Cable Disconnection and Connection.
- Enable the SIR system. Refer to SIR Disabling and Enabling.
 Overlap/Backing Plate Sectioning (Welding)
Warning: Refer to Approved Equipment for Collision Repair Warning in
the Preface section.
Fit the service panel to the vehicle to ensure a proper fit.
Measure and mark a line at th ...
 Headlamp Mount Panel Replacement (MAG-Welding)
Note: According to different corrosion warranties, only the
regional mandatory joining methods are allowed.
Removal Procedure
Warning: Refer to Approved Equipment for Collision Repair Warning in t ...
Other materials:
Rear Brake Rotor Replacement
Special Tools
CH 41013 Rotor Resurfacing Kit
CH 42450-A Wheel Hub Resurfacing Kit
For equivalent regional tools, refer to Special Tools.
Removal Procedure
Warning: Refer to Brake Dust Warning in the Preface section.
Remove rear brake caliper bracket. Refer to Rear Brake Caliper Br ...
Front Fog Lamp Bulb Replacement
Preliminary Procedures
Raise and support the vehicle. Refer to Lifting and Jacking the Vehicle
Disconnect the forward lamp electrical harness connector from the fog
lamp bulb socket.
Remove the Front Bumper Fascia Opening Lower Cover. Refer to Front
Bumper Fascia Opening Lowe ...
Loss of Control
Skidding
There are three types of skids that correspond to the vehicle's three control
systems:
• Braking Skid — wheels are not rolling.
• Steering or Cornering Skid — too much speed or steering in a curve causes tires
to slip and lose cornering force.
• Acceleration Skid — too much thro ...
