
Chevrolet Cruze Repair Manual: Front Fender Replacement
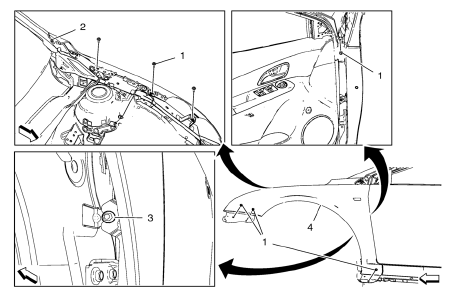
Preliminary Procedure
- Remove the front bumper fascia. Refer to Front Bumper Fascia Replacement
- Remove front bumper fascia guide. Refer to Front Bumper Fascia Replacement
- Remove the wheelhouse liner. Refer to Front Wheelhouse Liner Replacement
- Remove the headlamp. Refer to Headlamp Replacement
- Remove the air inlet grille panel. Refer to Air Inlet Grille Panel Replacement
- Remove the front fender shipping cover. Refer to Front Fender Shipping Cover Replacement
- Remove the front fender insulator. Refer to Front Fender Insulator Replacement
- Front Fender Bolt (Qty: 7)
Caution: Refer to Fastener Caution in the Preface section.
Tighten 8 N·m (70 lb in)
- Front Fender Bolt
Tighten 8 N·m (70 lb in)
- Front Fender Bolt
Tip Simply loosen the bolt rather than remove.
Tighten 8 N·m(70 lb in)
- Front Fender
Front Fender Shipping Cover Replacement
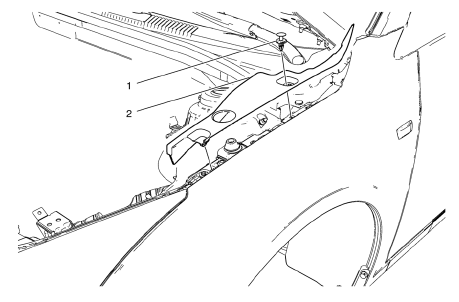
- Front Fender Insulator Retainer
- Front Fender Shipping Cover
 Rear Side Door Replacement
Preliminary Procedure
Remove the rear side door trim panel. Refer to Rear Side Door Trim
Replacement.
Rear Side Door Check Link Bolt
Caution: Refer to Fastener Caution in the Preface se ...
 Front Side Door Wiring Harness Replacement
Preliminary Procedure
Remove the front side door inner panel trim. Refer to Front Side Door Trim
Replacement.
Front Side Door Wiring Harness
Warning: Unless directed otherwise, the ignition a ...
Other materials:
Inflatable Restraint Side Impact Sensor Replacement
Warning: Refer to SIR Warning in the Preface section.
Warning: Refer to SIR Inflator Module Handling and Storage Warning in the
Preface section.
Warning: Following the deployment of a side impact air bag, inspect the
following parts for damage. Replace these parts if
necessary:
Th ...
Vehicle Alarm System
This vehicle has a theft alarm system.
Arming the System
To arm the system, use the power door lock switch or the RKE transmitter to lock
the vehicle while exiting with the vehicle turned off.
The alarm arms after about 30 seconds after all the doors have been closed.
Press again and the syst ...
Installation Procedure
Note: If the location of the original plug weld holes can not be
determined, space the plug weld holes every 40 mm (1½ in).
Drill 8 mm (5/16 in) for plug welding along the edges of the rear floor
panel filler as noted from the original
panel.
Clean and prepare the atta ...
