Chevrolet Cruze Repair Manual: Vehicle Access
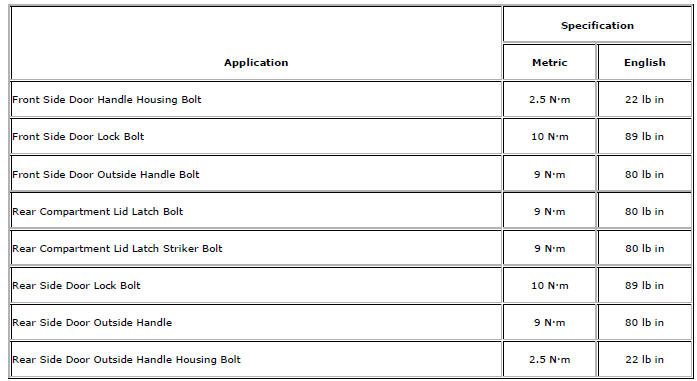
Specifications
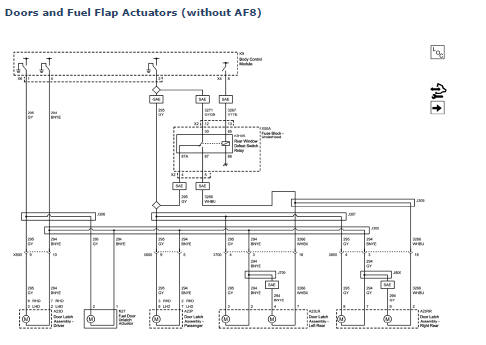
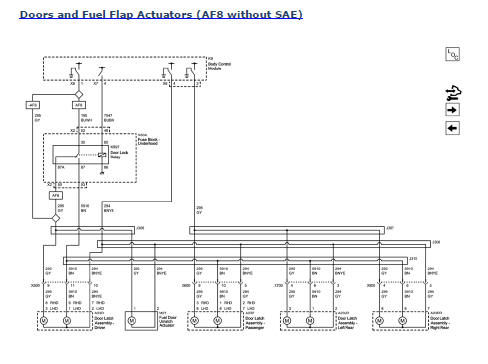
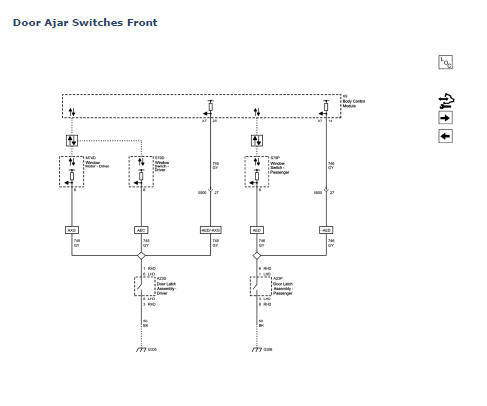
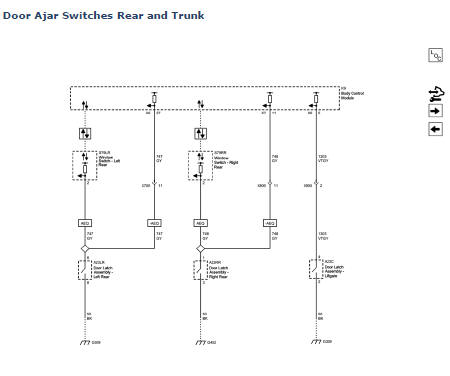
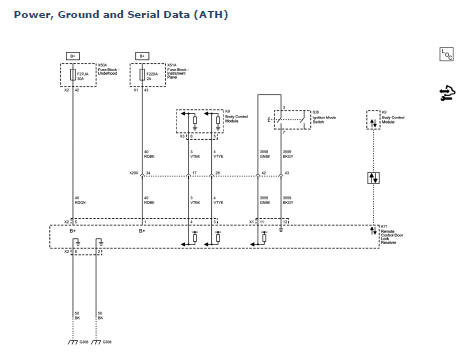
Door Lock/Indicator Schematics
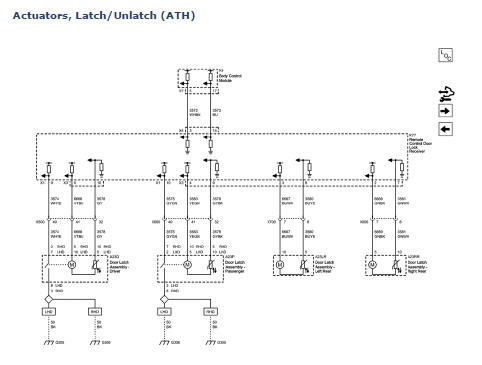
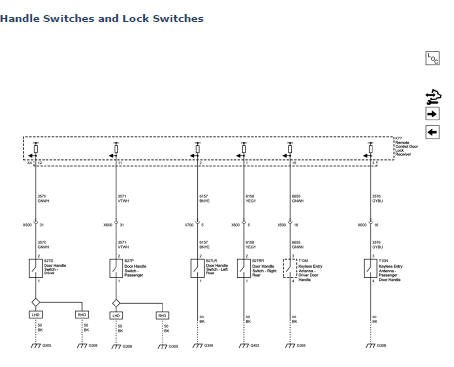

Door Control Module Schematics
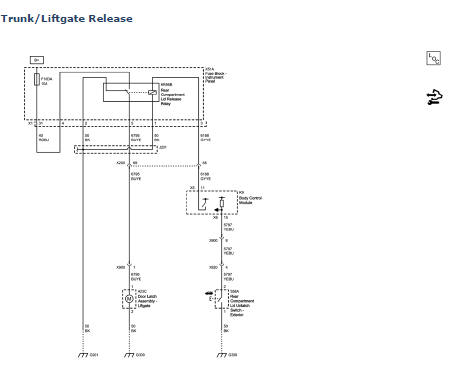
Release Systems Schematics
Fuel Tank Filler Door Lock Actuator Replacement
Preliminary Procedure
Remove the fuel tank filler housing. Refer to Fuel Tank Filler Pipe Housing Replacement.
- Fuel Tank Filler Door Lock Actuator Rod
- Fuel Tank Filler Door Lock Actuator
Front Side Door Lock Cylinder Replacement
- Bolt Access Plug
Procedure
Use a plastic flat-bladed tool to remove.
- Front Side Door Outside Handle Bolt
Caution: Refer to Fastener Caution in the Preface section.
Tighten 9 N·m (80 lb in)
- Front Side Door Lock Cylinder
Procedure
- Pull the lock cylinder from the housing to remove.
- Inspect the lock, lock cylinder and handle adjustments. Refer to Front Side Door Outside Handle Rod Adjustment.
Tip
Pull the front side door outside handle to unlock the door lock cylinder.
Front Side Door Outside Handle Replacement
- Bolt Access Plug
Procedure
Use a plastic flat-bladed tool to remove.
- Front Side Door Outside Handle Bolt
Caution: Refer to Fastener Caution in the Preface section.
Tighten 9 N·m (80 lb in)
- Front Door Outside Handle Cap
- Front Door Outside Handle Cap Gasket
- Front Door Outside Handle
Procedure
Pull the outside handle rearward to release it from the inside handle housing.
- Front Door Outside Handle Gasket
Procedure
Inspect the lock, lock cylinder and handle adjustments. Refer to Front Side Door Outside Handle Rod Adjustment.
Rear Side Door Outside Handle Replacement
- Bolt Access Plug
Procedure
Use a plastic flat-bladed tool to remove.
- Rear Side Door Outside Handle Cap Bolt
Caution: Refer to Fastener Caution in the Preface section.
Tighten 9 N·m (80 lb in)
- Rear Door Outside Handle Cap
- Rear Door Outside Handle
Procedure
Pull the outside handle rearward to release it from the handle housing.
- Rear Door Outside Handle Gasket
Procedure
Inspect the lock and handle adjustments. Refer to Rear Side Door Outside Handle Rod Adjustment.
Rear Side Door Outside Handle Housing Replacement
Preliminary Procedure
- Remove the rear side door trim. Refer to Rear Side Door Trim Replacement.
- Remove the water deflector. Refer to Rear Side Door Water Deflector Replacement.
- Remove the outside door handle. Refer to Rear Side Door Outside Handle Replacement.
- Rear Side Door Handle Housing Bolt
Caution: Refer to Fastener Caution in the Preface section.
Tighten 2.5 N·m (22 lb in)
- Rear Side Door Outside Handle Housing
Procedure
- Transfer the handle and lock rods to the new outside door handle housing.
- Inspect the lock, lock cylinder and handle adjustments. Refer to Rear Side Door Outside Handle Rod Adjustment.
Rear Compartment Lid Latch Replacement
Preliminary Procedure
Remove the rear compartment lid inner panel trim. Refer to Rear Compartment Lid Inner Panel Trim Replacement.
- Rear Compartment Lid Latch Bolt (Qty: 2)
Caution: Refer to Fastener Caution in the Preface section.
Tighten 9 N·m (80 lb ft)
- Rear Compartment Lid Latch
Front Side Door Lock Replacement
Preliminary Procedure
- Remove the front side door trim. Refer to Front Side Door Trim Replacement.
- Remove the water deflector. Refer to Rear Side Door Water Deflector Replacement.
Front Side Door Lock Screw (Qty: 2)
Caution: Refer to Fastener Caution in the Preface section.
Tighten 10 N·m (89 lb in)
Front Side Door Lock Assembly
Procedure
- Release the door lock cable retainers from the door.
- Disconnect the door lock electrical connector.
- Remove the door lock with the handle housing.
- Remove the handle and lock rods from the lock.
- Inspect the lock, lock cylinder and handle adjustments. Refer to Front Side Door Outside Handle Rod Adjustment.
Rear Door Lock Replacement
- Preliminary Procedure
- Remove the interior trim panel. Refer to Rear Side Door Trim Replacement.
- Remove the water deflector. Refer to Rear Side Door Water Deflector Replacement.
Rear Side Door Lock Bolt (Qty: 2)
Caution: Refer to Fastener Caution in the Preface section.
Tighten 10 N·m (89 lb in)
Rear Side Door Lock Assembly
Procedure
- Release the inside handle cable retainers before removing the door lock.
- Disconnect the door lock electrical connector.
- Remove the door lock with the handle housing.
- Transfer the handle and lock rods to the new door lock.
- Inspect the lock, lock cylinder and handle adjustments. Refer to Rear Side Door Outside Handle Rod Adjustment.
Front Side Door Outside Handle Housing Replacement

Preliminary Procedure
- Remove the front side door trim. Refer to Front Side Door Trim Replacement.
- Remove the water deflector. Refer to Front Side Door Water Deflector Replacement.
- Remove the outside door handle. Refer to Front Side Door Outside Handle Replacement.
Front Side Door Handle Housing Bolt
Caution: Refer to Fastener Caution in the Preface section.
Tighten 2.5 N·m (22 lb in)
Front Door Outside Handle Housing
Procedure
- Disconnect the lock and handle rods to remove the housing.
- Transfer the lock cylinder to the new housing. Refer to Front Side Door Lock Cylinder Replacement.
- Inspect the lock, lock cylinder and handle adjustments. Refer to Front Side Door Outside Handle Rod Adjustment.
Front Side Door Locking Rod Replacement
Preliminary Procedure
- Remove the interior trim panel. Refer to Front Side Door Trim Replacement.
- Remove the water deflector. Refer to Front Side Door Water Deflector Replacement.
- Remove the front side door lock. Refer to Front Side Door Lock Replacement.
Front Side Door Lock Rod
Procedure
Inspect the lock, lock cylinder and handle adjustments. Refer to Front Side Door Outside Handle Rod Adjustment.
Front Side Door Locking Rod Clip
Front Side Door Outside Handle Rod Adjustment
Preliminary Procedure
Remove the water deflector. Refer to Front Side Door Water Deflector Replacement.
Outside Door Handle Rod Clip
Procedure
Use a flat-head tool to open the clip from the threaded rod connecting the lock to the outside handle.
Outside Door Handle Rod
Procedure
- Position the outside door handle rod (2) in the clip (1) in order to eliminate any free play in the outside door handle.
- Adjust the travel of the handle by removing the threaded rod in the clip.
- Install the clip cover closed over the threaded outside door handle rod.
- Inspect the door lock system for proper operation.
Rear Side Door Locking Rod Replacement
Preliminary Procedure
- Remove the rear side door trim. Refer to Rear Side Door Trim Replacement
- Remove the water deflector. Refer to Rear Side Door Water Deflector Replacement
- Remove the rear side door lock. Refer to Rear Door Lock Replacement
Rear Side Door Lock Rod
Procedure
Inspect the lock, lock cylinder and handle adjustments. Refer to Rear Side Door Outside Handle Rod Adjustment
Rear Side Door Locking Rod Clip
- Rear Side Door Outside Handle Rod Adjustment
- Door Ajar Indicator Description and Operation
- Luggage Compartment Description and Operation
- Power Door Latch Description and Operation
- Power Door Locks Description and Operation
 Mirrors
Specifications
Inside Rearview Mirror Schematics
Outside Rearview Mirror Schematics
Outside Rearview Mirror Replacement
Preliminary Procedure
Remove the front side door tri ...
 Rear Side Door Outside Handle Rod Adjustment
Removal Procedure
Remove the rear door water deflector as needed. Refer to Rear Side Door
Water Deflector Replacement.
Use a flat-head tool to open the clip from the threaded rod connecti ...
Other materials:
Steering Linkage Inner Tie Rod Replacement (Hydraulic Power Steering)
Special Tools
CH-6247 Removal and Installation Tool for the Steering Linkage Inner Tie Rod
For equivalent regional tools, refer to Special Tools.
Removal Procedure
Raise and support the vehicle. Refer to Lifting and Jacking the
Vehicle.
Remove the tire and wheel assembly. Refer to ...
Installation Procedure
Drill 8 mm (5/16 in) for plug welding along the edges of the front
wheelhouse panel rear reinforcement as noted from the original
panel.
Drill 8 mm (5/16 in) for plug welding where front wheelhouse front panel
and front wheelhouse panel rear reinforcement overlap ...
Instrument Panel and Console Trim
Specifications
Instrument Panel Insulator Seal Replacement
Preliminary Procedure
Remove the instrument panel assembly. Refer to Instrument Panel Assembly
Replacement.
Instrument Panel Insulator Seal
Steering Column Upper Trim Cover Replacement
Preliminary Procedure
Remo ...
