Chevrolet Cruze Repair Manual: Front Lower Control Arm Bushing Replacement
Preliminary Procedure
- Raise and support the vehicle. Refer to Lifting and Jacking the Vehicle.
- Remove the tire and wheel. Refer to Tire and Wheel Removal and Installation.
- Remove the lower control arm. Refer to Lower Control Arm Replacement.
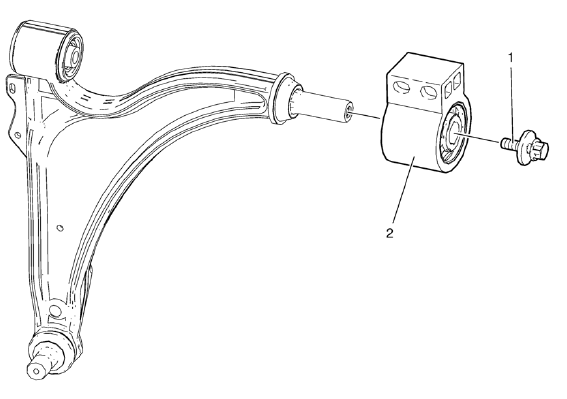
Lower Control Arm Rear Bushing Bolt
Lower Control Arm Rear Bushing
Caution: Refer to Fastener Caution in the Preface section.
Procedure
- Discard Bushing Bolt and use NEW ONLY.
- Tighten Bushing Bolt with vehicle standing on the ground.
Tighten 55 N·m (41 lb ft) +45-60 degrees
Special Tools
EN-45059 Torque Angle Sensor Kit . Refer to Special Tools.
 Installation Procedure
Position the lower control arm (1) in the cradle.
Install and hand tighten the NEW rear lower control arm bushing nuts and
bolts (1).
Install and hand tighten the NEW fro ...
 Wheel Stud Replacement
Special Tools
CH-43631 Ball Joint Remover
For equivalent regional tools, refer to Special Tools.
Removal Procedure
Raise and suitably support the vehicle. Refer to Lifting and
Jacking ...
Other materials:
Fuses and Circuit Breakers
The wiring circuits in the vehicle are protected from short circuits by a combination
of fuses and circuit breakers. This greatly reduces the chance of damage caused
by electrical problems.
To check a fuse, look at the silver-colored band inside the fuse.
If the band is broken or melted, repla ...
Brakes
This vehicle has front disc brakes and could have rear drum brakes or rear disc
brakes.
Disc brake pads have built-in wear indicators that make a high-pitched warning
sound when the brake pads are worn and new pads are needed.
The sound can come and go or be heard all the time the vehicle is m ...
Headlamp Mount Panel Replacement (MAG-Welding)
Note: According to different corrosion warranties, only the
regional mandatory joining methods are allowed.
Removal Procedure
Warning: Refer to Approved Equipment for Collision Repair Warning in the
Preface section.
Warning: Refer to Glass and Sheet Metal Handling Warning in the Preface sec ...
