Chevrolet Cruze Repair Manual: Front Side Door Replacement

Preliminary Procedure
Remove the front side door trim panel. Refer to Front Side Door Trim Replacement.
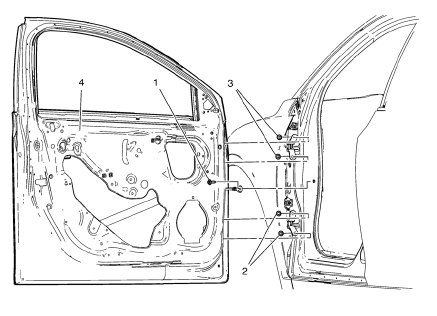
- Front Side Door Check Link Bolt
Caution: Refer to Fastener Caution in the Preface section.
Procedure
- Remove the water deflector.
- Disconnect the door electrical connector.
- Support the door before removing the hinge bolts.
- With the aid of an assistant, remove the door.
Tighten 25 N·m (18 lb ft)
- Front Side Door Lower Hinge Bolt (Qty: 2)
Tighten 25 N·m (18 lb ft)
- Front Side Door Upper Hinge Bolt (Qty: 2)
Tighten 25 N·m (18 lb ft)
- Front Side Door
Procedure
- Transfer all of the internal components.
- Adjust the front side door as needed. Refer to Front Side Door Adjustment.
 Front Side Door Adjustment
Preliminary Procedure
Remove the front wheelhouse liner. Refer to Front Wheelhouse Liner
Replacement.
Front Side Door
Caution: Refer to Fastener Caution in the Preface section.
Procedure
...
 Rear Side Door Adjustment
Rear Side Door
Caution: Refer to Fastener Caution in the Preface section.
Procedure
Loosen the rear door hinge bolt (Qty: 4) to adjust the rear door.
Adjust the rear door in order to ...
Other materials:
Installation Procedure
Cut the front compartment front rail in corresponding locations to fit
the remaining original panel. The sectioning joint should be
trimmed to allow a gap of one-and-one-half-times the metal thickness at the
sectioning joint.
Create a 50 mm (2 in) backing plate from the unused porti ...
Front Side Door Upper Hinge and Lower Hinge Replacement
Preliminary Procedure
Remove the front wheelhouse liner. Refer to Front Wheelhouse Liner
Replacement.
Remove the front fender insulator. Refer to Front Fender Insulator
Replacement.
Remove the front side door. Refer to Front Side Door Replacement.
Front Side Door Hinge Bolt ( ...
Installation Procedure
Align the rear compartment floor panel.
Drill 8 mm (5/16 in) for plug welding along the edges of the rear compartment
floor panel as noted from the original panel.
Clean and prepare the attaching surfaces for
welding.
Position the rear compartment floor panel on the vehicle.
V ...
