Chevrolet Cruze Repair Manual: Headlining Trim Panel Replacement (Without Sunroof)
Warning: Do not attempt to repair or alter the head impact energy-absorbing material glued to the headliner or to the garnish trims. If the material is damaged, replace the headliner and/or the garnish trim. Failure to do so could result in personal injury.
Caution: If a vehicle is equipped with a head curtain inflator module ensure that the inflator module and tether are undamaged. If tether or curtain airbag are damaged in any way, they must be replaced.
Caution: Use care when working around the head curtain inflator module. Sharp tools may puncture the curtain airbag. If the head curtain inflator module is damaged in any way, it must be replaced.
Preliminary Procedure
- Disable the SIR system. Refer to SIR Disabling and Enabling
- Remove the sunshade supports. Refer to Sunshade Support Replacement
- Remove the roof console. Refer to Roof Console Replacement
- Remove the windshield outside moisture sensor cover. Refer to Windshield Outside Moisture Sensor Cover Replacement
- Remove the assist handles. Refer to Assist Handle Replacement
- Remove the windshield garnish moldings. Refer to Windshield Garnish Molding Replacement
- Remove the center pillar upper garnish moldings. Refer to Center Pillar Upper Garnish Molding Replacement
- Remove the quarter window garnish moldings. Refer to Quarter Window Garnish Molding Replacement
- Move the front seat fully forward and recline.
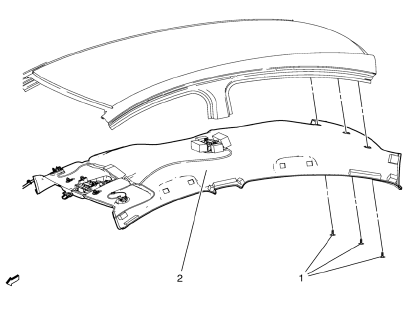
- Headliner Trim Panel Retainer (Qty: 3)
- Headliner Trim Panel Assembly
Procedure
Disconnect the electrical connectors.
 Headlining Trim Panel Replacement (With Sunroof)
Warning: Do not attempt to repair or alter the head impact
energy-absorbing material glued to the headliner or to the garnish
trims. If the material is damaged, replace the headliner and/or the ...
 Instrument Panel and Console Trim
Specifications
Instrument Panel Insulator Seal Replacement
Preliminary Procedure
Remove the instrument panel assembly. Refer to Instrument Panel Assembly
Replacement.
Instrument P ...
Other materials:
Power Steering Fluid Reservoir Replacement
Preliminary Procedure
Remove as much power steering fluid from the remote power steering fluid
reservoir as possible.
Place drain pans under the vehicle as needed.
Hose Clamp
Procedure
Compress the power steering fluid reservoir outlet and inlet hose clamp
from the power ...
Air Conditioning Compressor Replacement (1.6L LXT)
Preliminary Procedures
Recover the refrigerant. Refer to Refrigerant Rec overy and
Recharging.
Remove drive belt. Refer to Generator and Air Conditioning Compressor
and Power Steering Pump Belt Replacement.
Raise and support the vehicle. Refer to Lifting and Jacking the Vehic ...
Installation Procedure
Drill 8 mm (5/16 in) for plug welding along the edges of the front
wheelhouse panel rear reinforcement as noted from the original
panel.
Drill 8 mm (5/16 in) for plug welding where front wheelhouse front panel
and front wheelhouse panel rear reinforcement overlap ...
