Chevrolet Cruze Repair Manual: Instrument Panel Upper Trim Pad Insert Replacement
Preliminary Procedure
Remove the instrument panel. Refer to Instrument Panel Assembly Replacement.
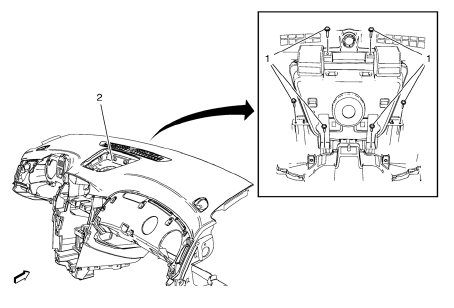
- Instrument Panel Upper Trim Pad Insert Screw (Qty: 6)
Caution: Refer to Fastener Caution in the Preface section.
Tighten 2.5 N·m (22 lb in)
- Instrument Panel Upper Trim Pad Insert Assembly
Instrument Panel Inflatable Restraint Module Bracket Replacement
Preliminary Procedure
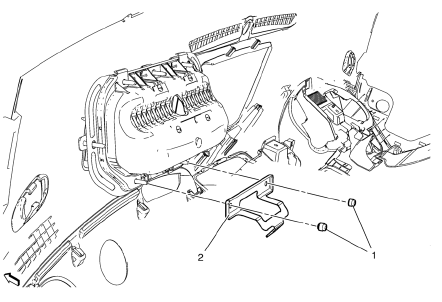
Remove the instrument panel assembly. Refer to Instrument Panel Assembly Replacement.
- Instrument Panel Inflatable Restraint Module Bracket Nut (Qty: 2)
Caution: Refer to Fastener Caution in the Preface section.
Tighten 9 N·m (80 lb in)
- Instrument Panel Inflatable Restraint Module Bracket Assembly
 Instrument Panel Compartment Replacement
Preliminary Procedure
Remove the instrument panel outer trim cover - right side. Refer to
Instrument Panel Outer Trim Cover Replacement - Right Side.
Instrument Panel Compartment Screw (Qty ...
 Instrument Panel Assembly Replacement
Preliminary Procedures
Disable the SIR system. Refer to SIR Disabling and Enabling
Remove the front floor console assembly. Refer to Front Floor Console
Replacement.
Remove ...
Other materials:
Child Seat Restraint System
Warning: A child in a rear-facing child restraint can be seriously
injured if the right-front passengers air bag inflates. This is because the
back of a rear-facing child restraint would be very close to the inflating air
bag. NEVER use a rear-facing child restraint in this vehicle. If a
forwa ...
Installation Procedure
Position the lower control arm (1) in the cradle.
Install and hand tighten the NEW rear lower control arm bushing nuts and
bolts (1).
Install and hand tighten the NEW front lower control arm nut and bolt
(1).
Caution: Refer to Fastener Caution in the Preface secti ...
Safety Belt Reminders
Driver Safety Belt Reminder Light
There is a driver safety belt reminder light on the instrument cluster.
When the vehicle is started, this light flashes and a chime may come on to remind
the driver to fasten their safety belt. Then the light stays on solid until the
belt is buckled.
This c ...
