
Chevrolet Cruze Owners Manual: License Plate Lamp
To replace the license plate lamp bulb:
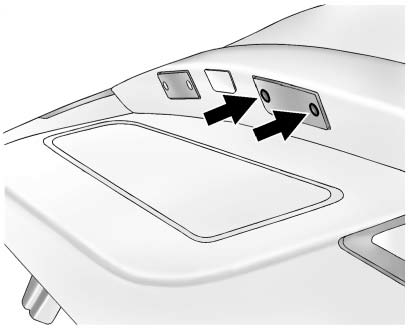
1. Remove the two screws from the license plate lamp assembly.
2. Turn and pull the license plate lamp assembly down.
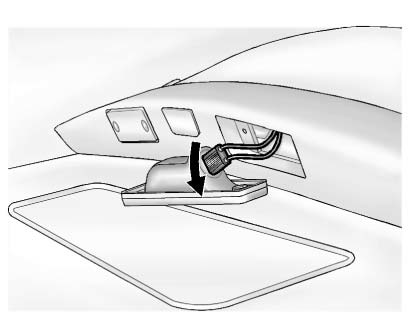
3. Turn the bulb socket counterclockwise and pull straight out of the lamp assembly.
4. Remove the bulb by pulling it straight out of the socket.
5. Push the new bulb into the socket.
6. Install the bulb socket by turning clockwise into the license plate lamp assembly.
7. Replace the license plate lamp assembly and tightien the two screws to secure.
 Taillamps, Turn Signal, Sidemarker, Stoplamps, and Back-Up Lamps
Trunk Deck Inboard Taillamps
1. Open the trunk.
2. Remove the trunk deck trim cover (1).
3. Remove the bulb socket (2) by turning counterclockwise and pulling straight out.
4. Remove the bul ...
 Replacement Bulbs
For replacement bulbs not listed here, contact your dealer. ...
Other materials:
Antilock Brake System (ABS) Warning Light
The Antilock Brake System (ABS) light comes on briefly when the engine is started.
If the light does not come on, have it fixed so it will be ready to warn if there
is a problem.
If the ABS light comes on and stays on while driving, stop as soon as possible
and turn the ignition off.
Start ...
Removal Procedure
Warning: Refer to Approved Equipment for Collision Repair Warning in the
Preface section.
Warning: Refer to Collision Sectioning Warning in the Preface section.
Warning: Refer to Glass and Sheet Metal Handling Warning in the Preface section.
Disable the SIR System. Refer to SIR Dis ...
Removal Procedure
Disable the SIR System. Refer to SIR Disabling and Enabling.
Disconnect the negative battery cable. Refer to Battery Negative Cable
Disconnection and Connection.
Remove all related panels and components.
Visually inspect the damage. Repair as much of the damage as possible.
Remove the ...
