Chevrolet Cruze Repair Manual: Removal Procedure
Warning: Refer to Approved Equipment for Collision Repair Warning in the Preface section.
Warning: Refer to Collision Sectioning Warning in the Preface section.
Warning: Refer to Glass and Sheet Metal Handling Warning in the Preface section.
- Disable the SIR System. Refer to SIR Disabling and Enabling.
- Disconnect the negative battery cable. Refer to Battery Negative Cable Disconnection and Connection.
- Remove all related panels and components.
- Visually inspect the damage. Repair as much of the damage as possible.
- Remove the sealers and anti-corrosion materials from the repair area, as necessary. Refer to Anti-Corrosion Treatment and Repair.
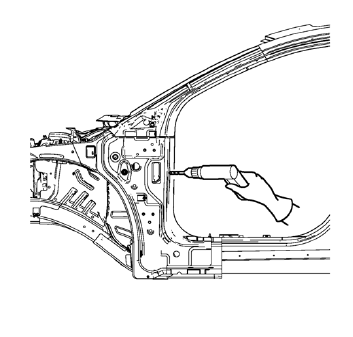
- Locate and mark all the necessary factory welds of the front hinge pillar body.
- Drill all factory welds. Note the number and location of welds for installation of the service assembly.
- Remove the damaged front hinge pillar body reinforcement.
 Body Hinge Pillar Lower Reinforcement Replacement (MAG-Welding)
Note: According to different corrosion warranties, only the
regional mandatory joining methods are allowed. ...
 Installation Procedure
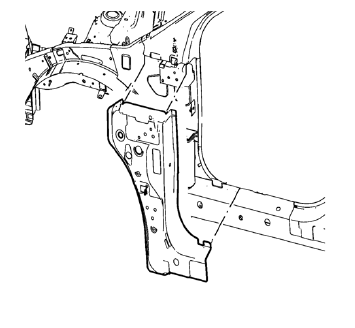
Prepare all mating surfaces as necessary.
Align the front hinge pillar body reinforcement.
Drill 8 mm (5/16 in) for plug welding along the edges of the front hinge
pillar body as not ...
Other materials:
Headlamp Mount Panel Replacement (MAG-Welding)
Note: According to different corrosion warranties, only the
regional mandatory joining methods are allowed.
Removal Procedure
Warning: Refer to Approved Equipment for Collision Repair Warning in the
Preface section.
Warning: Refer to Glass and Sheet Metal Handling Warning in the Preface sec ...
Floor Mats
WARNING
If a floor mat is the wrong size or is not properly installed, it can interfere
with the pedals.
Interference with the pedals can cause unintended acceleration and/or increased
stopping distance which can cause a crash and injury. Make sure the floor mat does
not interfere with the p ...
Driving Characteristics and Towing Tips
Driving with a Trailer
When towing a trailer:
• Become familiar with the state and local laws that apply specifically to trailer
towing.
• Do not tow a trailer during the first 800 km (500 mi), to prevent damage to the
engine, axle or other parts.
• Then, during the first 800 km (500 mi) tra ...
