Chevrolet Cruze Repair Manual: Removal Procedure
Warning: Refer to Approved Equipment for Collision Repair Warning in the Preface section.
Warning: Refer to Collision Sectioning Warning in the Preface section.
Warning: Refer to Glass and Sheet Metal Handling Warning in the Preface section.
- Disable the SIR System. Refer to SIR Disabling and Enabling.
- Disconnect the negative battery cable. Refer to Battery Negative Cable Disconnection and Connection.
- Remove all related panels and components.
- Visually inspect the damage. Repair as much of the damage as possible.
- Remove the sealers and anti-corrosion materials from the repair area, as necessary. Refer to Anti-Corrosion Treatment and Repair.
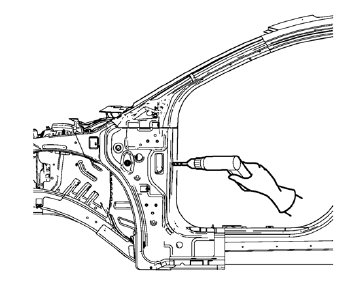
- Locate and mark all the necessary factory welds of the front hinge pillar body.
- Drill all factory welds. Note the number and location of welds for installation of the service assembly.
- Remove the damaged front hinge pillar body reinforcement
 Body Hinge Pillar Lower Reinforcement Replacement (MIG-Brazing)
Note: According to different corrosion warranties, only the
regional mandatory joining methods are allowed. ...
 Installation Procedure
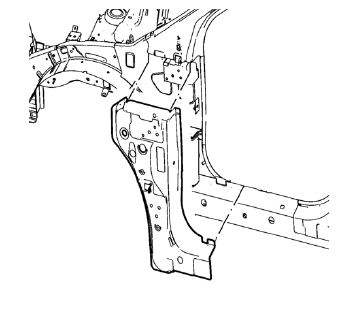
Prepare all mating surfaces as necessary.
Align the front hinge pillar body reinforcement.
Create 6 x 20 mm (4/16 x 12/16 in) slots for MIG-brazing in locations
where you can not app ...
Other materials:
Inflatable Restraint Steering Wheel Module Coil Centering
Caution: The new SIR coil assembly will be centered. Improper
alignment of the SIR coil assembly may damage the unit, causing an
inflatable restraint malfunction.
Verify the following conditions before centering the supplemental
inflatable restraint (SIR) steering wheel module co ...
Overview
1.
• Turns the system on or off and adjusts the volume.
2. Buttons 1 to 6
• Radio: Saves and selects favorite stations.
3.
• Radio: Seeks the previous station.
• CD: Selects the previous track or rewinds within a track.
4.
• CD: Pauses playback, and stops playback.
5.
• Radio: ...
Tail Lamp Replacement
Preliminary Procedures
Open and support the rear compartment
lid.
Remove the body side trim panel replacement in order to expose the tail
lamp pocket nuts. Refer to Body Side Trim Panel
Replacement - Left Side.
Tail Lamp Bolt (Qty: 2)
Caution: Refer to Fastener Caut ...
